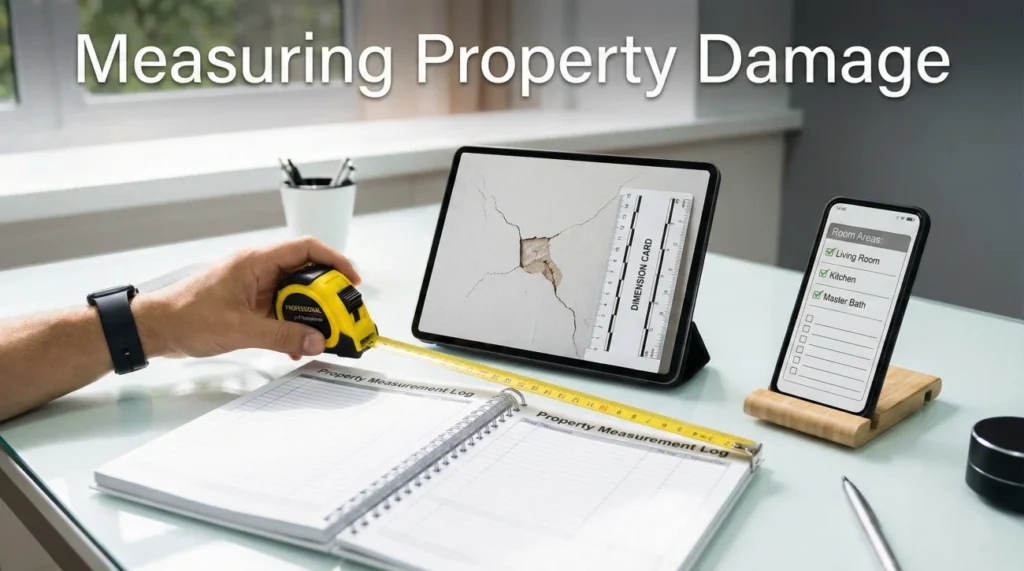
- Photographs alone cannot provide the exact scale needed to build an accurate claim estimate. You must record specific dimensions of the affected areas.
- Always record two sets of numbers: the overall dimensions of the entire room and the specific measurements of the damaged area itself.
- Use the “link-to-photo” rule by physically placing a piece of paper with the written dimensions inside the frame of your damage photos.
- Keep a central written log of all measurements mapped to specific photo IDs to serve as a reliable backup when field adjusters ask for clarification.
The Missing Context in Claim Photos
When you discover damage in your home, your first instinct is usually to pull out your phone and start taking pictures. That is absolutely the right first step. However, having reviewed thousands of claim files in my operational career, I can tell you that photos have a major hidden flaw. They do not show true scale.
A close-up photograph of a water stain on a ceiling looks exactly the same whether that stain is two feet wide or twelve feet wide. When a desk adjuster receives a folder full of tight, zoomed-in photos without any accompanying numbers, the file immediately slows down. They cannot write an estimate to replace drywall if they do not know how many square feet of drywall are actually ruined.
Recording clear, accurate dimensions is one of the most powerful habits you can build during the initial stages of a property loss. It removes the guesswork from the process. While specific measurement requirements can vary slightly between insurance carriers, the fundamental need for baseline scope data remains the same everywhere. When you provide the exact measurements of the damage alongside your photos, you are handing the processing team the exact data points they need to process the file efficiently. My goal is to show you exactly what to measure, how to record it clearly, and how to attach the scale in-frame so the reviewer can follow it without back-and-forth.
The Two Layers of Measurement Documentation
A common mistake I see is when someone only measures the exact spot of the damage. For example, they will note that a hole in the wall is three feet by three feet. While that is true, it is not the complete picture. In the world of property claims, repairs often require replacing materials across a larger continuous area to match paint, texture, or structural integrity.
To prevent constant back-and-forth requests for more information, you need to capture two distinct layers of measurements for every affected space.
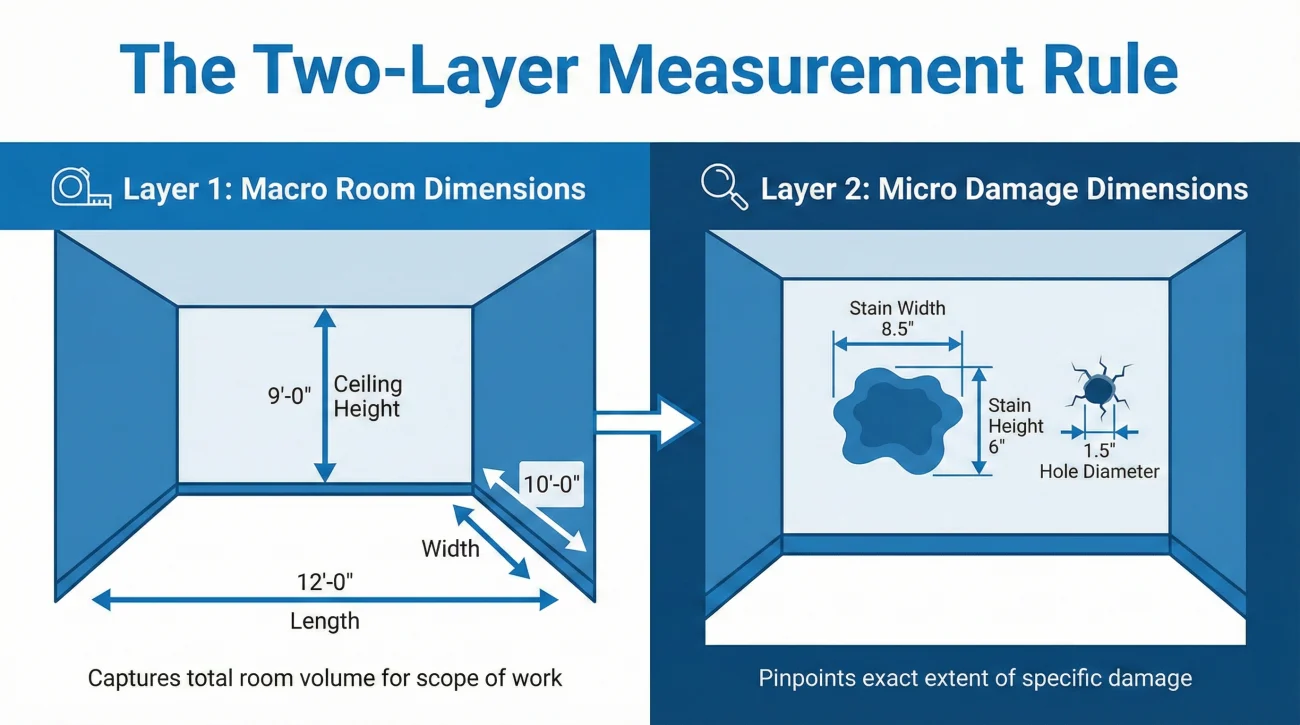
Layer One: The Macro Room Dimensions
Before you measure a single piece of damage, you need to record the overall dimensions of the room where the damage occurred. This provides the baseline scope. If a floor needs to be entirely replaced due to widespread water damage, the adjuster needs the total square footage of the room.
For every affected room, record the length, the width, and the ceiling height. Even if the damage is only on the floor, capturing the ceiling height is a highly recommended habit. It defines the total volume of the room, which becomes relevant if mitigation teams need to calculate the space for drying equipment like dehumidifiers.
Layer Two: The Micro Damage Dimensions
Once you have the overall room size on paper, you zoom in on the specific damage. This is where you measure the exact boundaries of the affected materials. You are defining the footprint of the loss. If a section of baseboard is warped, you record the exact linear length of the warped section. If a window is shattered, you record the exact height and width of the glass pane.
Writing down “water stain on living room wall.”
Writing down “Living Room (15ft x 20ft, 9ft ceiling). Water stain on North wall measures 4ft wide by 3ft high, starting from the baseboard.”
The Baseline Measurement Checklist by Area
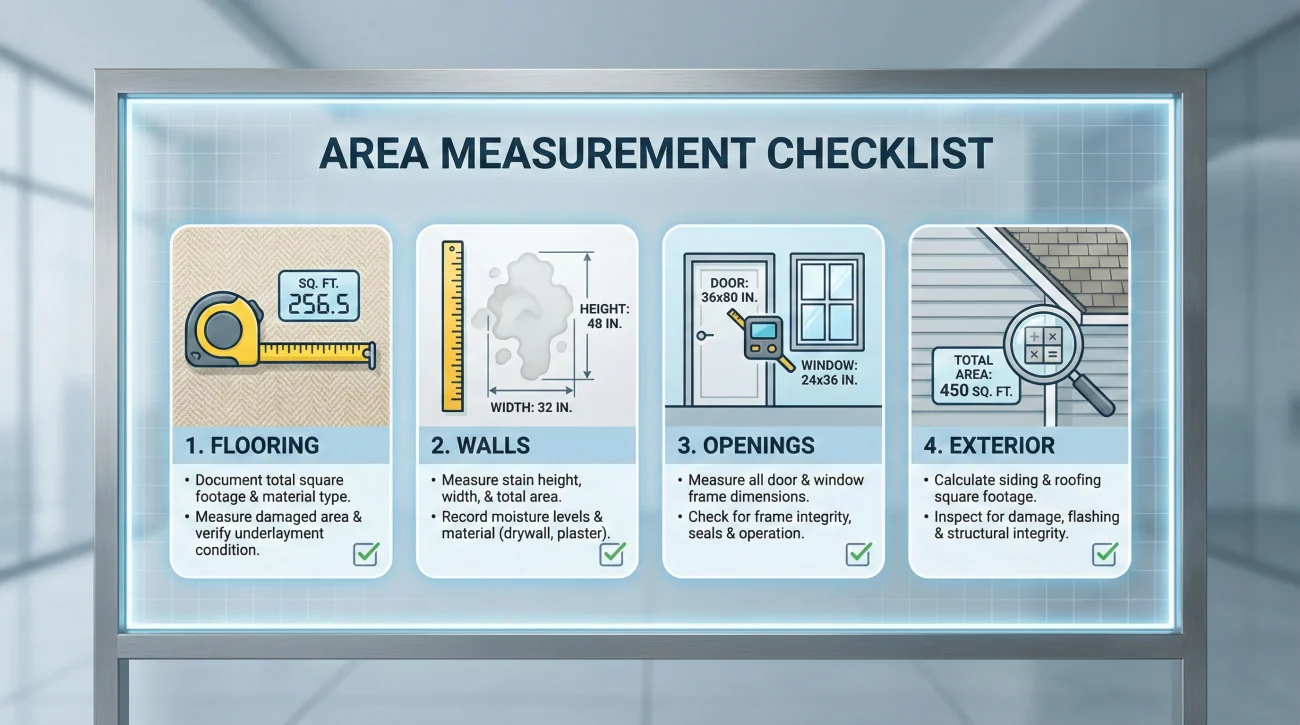
Walking into a damaged room can be overwhelming. To stay focused, I always recommend breaking the room down into distinct structural categories. This ensures you do not miss critical dimensions that will inevitably be requested later in the review process.
Here is a practical checklist of what numbers you should be capturing as you document a damaged space:
- 📏 The Flooring: Record the continuous length and width of the damaged flooring area. Note where the flooring transitions to another material (like carpet meeting tile) and record the distance to that transition point.
- 🧱 The Walls (Drywall/Plaster): Measure the height and width of any visible stains, cracks, or holes. Crucially, measure how high up the wall the damage goes. If water wicked up the drywall, the exact height of the moisture line is a critical data point for the estimate.
- 🚪 The Openings (Doors and Windows): If a door or window is compromised, measure the opening itself. Record the width and height of the frame. Do not just measure the glass; the entire frame assembly often dictates the replacement scope.
- 🏠 The Exterior Elements: For siding or roofing damage, estimate the square footage of the visibly affected area. If a section of fence blew down, record the linear footage of the missing or broken panels.
Key Point: You do not need to be perfectly exact down to the sixteenth of an inch. Consistency matters more than perfection. Your goal is to provide a highly accurate, reliable baseline that allows the processing desk to understand the true scale of the required repairs.
Measurement Tolerance: What “Accurate Enough” Means
Many homeowners freeze up because they are worried about getting the numbers slightly wrong. In the initial documentation phase, you are not writing the final contractor invoice. You are providing scale.
Here is how to handle measurement tolerance safely:
- ✅ Always state the unit explicitly. Never write “12×14” without noting if it is inches or feet.
- ✅ Round to the nearest whole inch for specific damage footprints (e.g., a hole in the wall).
- ✅ Round to the nearest half-foot for overall room dimensions.
- ✅ Keep your formatting consistent across every entry in your log.
- ✅ Do not guess. If you cannot reach a ceiling stain safely, write “estimated ceiling height” rather than presenting a guess as a hard fact.
Adapting Dimensions to the Type of Loss
Not all damage requires the exact same measurement approach. Depending on what caused the loss, the desk adjuster will be looking for different specific numbers to validate the scope of work.
If you are dealing with a water-related event, the vertical dimension is often the most heavily scrutinized number. Water travels outward and upward. You need to record how far water spread across the floor and exactly how high it wicked into the walls or cabinetry. These numbers directly impact how much drywall must be cut out and replaced.
For smoke or fire events, the horizontal spread across the ceiling is critical. Smoke rises and pools at the highest points before traveling down the walls. Recording the total ceiling dimensions of the affected rooms, plus the depth of the soot lines down the walls, helps define the required cleaning and painting scope.
For impact events, such as a tree falling against a structure, depth becomes a factor. You are not just measuring a flat stain; you are measuring how far an object penetrated the structural envelope. Recording the width, height, and approximate depth of the impact zone provides a much clearer picture for the structural review desk.
How to Measure Irregular Damage Shapes
Water stains and smoke plumes are rarely perfect squares. When dealing with irregular shapes, the easiest operational approach is to use the “bounding box” method. You measure the maximum width and the maximum height of the affected area, imagining a rectangle drawn around the furthest edges of the stain.
Alternatively, if the damage is spread out across a large, strangely shaped footprint, break it down. Mentally divide the damage into two or three smaller rectangular zones and record those dimensions separately. Always add a short note in your log clarifying that the shape is irregular or scattered.
The Link-to-Photo Rule: Making Numbers Useful
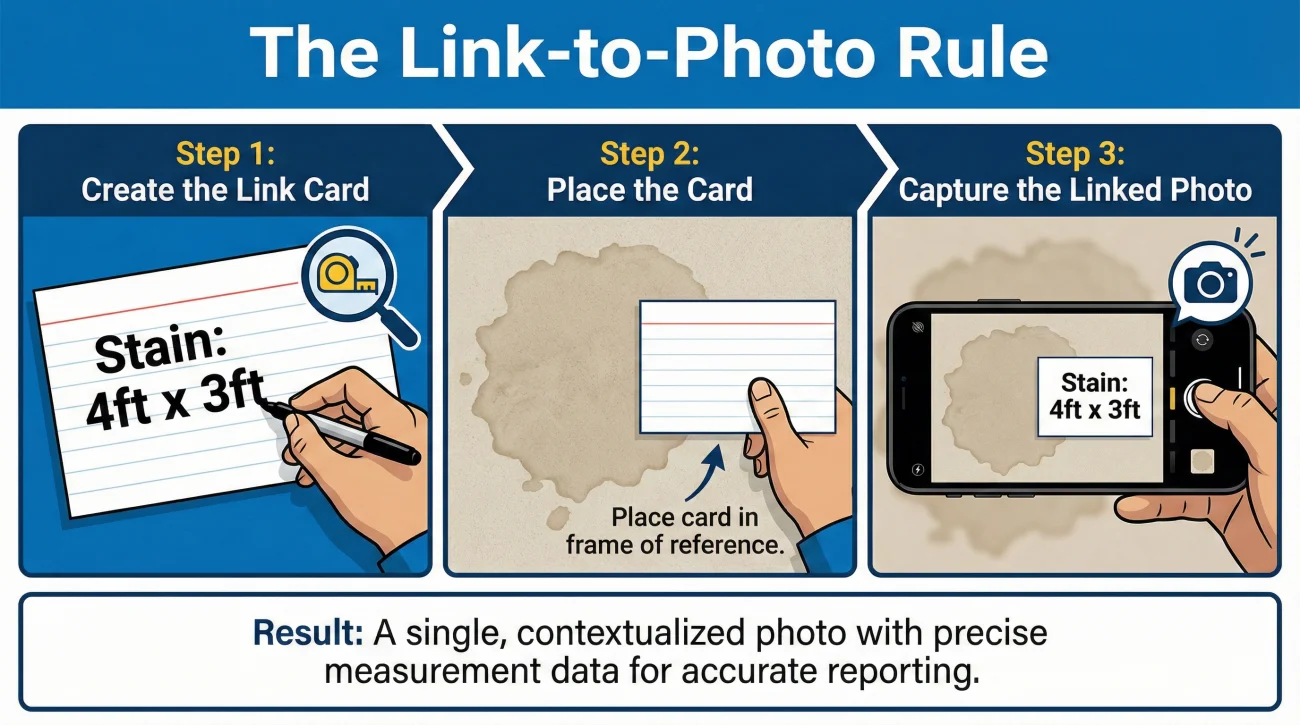
Writing numbers down in a notebook is good, but it is not enough on its own. In claims operations, a number is only as valuable as the evidence that proves it. If you submit a list of measurements without connecting them to your visual evidence, the reviewer still has to guess which number belongs to which wall.
This is where you apply the “link-to-photo” rule. You must permanently bind the numerical measurement to the visual evidence.
The simplest, most operational way to do this is using a blank index card or a small piece of paper. When you identify a damaged area, use a thick marker to write down the dimension of that specific spot. For example, write “Stain: 4ft x 3ft”. Then, physically place or tape that card directly next to the damage and take your photograph.
When the photo reaches the reviewer’s screen, they instantly see the damage and the exact scale simultaneously. They do not have to cross-reference an email, open a separate spreadsheet, or guess. The number travels with the photo.
💡 Pro Tip: If the damage is too large for a single index card to be readable in the photo, take a wide establishing shot of the entire wall first. Then, take a second, closer photo that clearly shows the written dimension card next to the specific damage zone. This two-step method is a core part of building a solid property claim evidence pack.
Creating A Simple Photo-to-Log Index System
Even though you are binding numbers to photos, you still need a master document. Photographs can get out of order during upload, and having a central text log prevents information from getting lost in the shuffle.
You do not need complicated software for this. A simple spreadsheet or a clear handwritten table works perfectly. To make it truly professional, tie your log directly to your file names. For example, name your photos clearly like Kitchen_01_Wide.jpg and Kitchen_02_DetailCard.jpg, and list those IDs in your document.
Your tracking log should include a few simple, standardized columns to ensure the data maps perfectly to your evidence:
| Photo ID | Room / Area | Overall Dimensions | Specific Damage Description | Damage Dimensions |
|---|---|---|---|---|
| PrimaryBed_03.jpg | Primary Bedroom | 12ft L x 14ft W (8ft Ceiling) | Water stain on East wall above window | 2.5ft W x 1.5ft H |
| Kitchen_02.jpg | Kitchen | 10ft L x 15ft W (9ft Ceiling) | Warped laminate flooring near sink | 4ft L x 3ft W |
A Measurement Scenario That Prevents Rework
Let’s look at how strong measurement habits prevent delays in the real world. Imagine a scenario where a supply line bursts in a secondary bathroom. The water flows out of the bathroom, soaking a section of carpet in the adjacent hallway.
A poorly documented file might just include a photo of a wet hallway carpet with a note saying, “Hallway flooded.” The desk adjuster receives this. They know the carpet is wet, but they cannot approve the replacement cost because they have no idea if the hallway is five feet long or twenty feet long. They have to pause the file and assign a field resource just to pull a tape measure across that hallway, which adds days to the timeline.
Now consider the organized approach. You walk into the hallway. You write “Hallway Total: 3ft x 12ft” on an index card and snap a photo. You write “Wet Zone: 3ft x 4ft” on another card and place it where the wet carpet meets the dry carpet, snapping a second photo. Finally, you log these numbers in your master list with the corresponding Photo IDs.
When the reviewer opens this second file, they have the total square footage of the hallway and the exact footprint of the wet area. They can instantly verify the numbers and move the item to the approved column without requesting a secondary inspection. That is the operational power of recording dimensions upfront.
Common Measurement Mistakes That Cause Delays
Even with good intentions, it is easy to make clerical errors when documenting a loss. Under stress, people often rush through the documentation phase. I consistently see a few specific errors that cause files to bounce back for clarification.
The most frequent mistake is assuming the field adjuster will catch everything. Many claimants skip taking their own measurements entirely, relying 100% on the insurer’s representative. While the field representative will certainly take their own notes, having your own independent record is vital. If their notes are lost, or if their initial report omits a damaged corner of the room, your measurement log becomes the primary evidence used to correct the oversight.
Another major mistake is mixing up units of measurement without noting them. If you write down “12×14” without specifying feet or inches, it creates immediate ambiguity. In a kitchen, 12×14 could mean a 12-foot by 14-foot room, or it could mean a 12-inch by 14-inch damaged cabinet door. Always include the unit indicator (ft or in) next to every single number you write down.
Finally, forgetting to measure continuous materials is a frequent trap. If a laminate floor is damaged in the living room, but that same laminate continues seamlessly down the hall without a break, you must measure the living room and the hallway. The repair scope may require addressing the entire continuous surface, and having both measurements ready prevents the estimate from falling short.
Sharing Your Dimensions With the Desk
Once you have captured your photos, linked your index cards, and built your written log, you need to deliver this data effectively. Do not just dump a text file full of numbers into an email without context. You want to present it as a complete, organized package that is easy for a reviewer to digest.
When you are ready to submit your evidence, attach your master measurement log alongside your organized photos. You want to clearly state what you are providing so there is no confusion about the contents of the message.
Here is a clean, operational script you can use when emailing your documentation:
Hello [Adjuster Name],
I have completed my initial documentation of the damaged areas. Attached to this email, you will find my master measurement log outlining the overall room dimensions and the specific footprint of the damage in each area.
I have also uploaded the corresponding photographs to the portal. You will notice that I have included visual dimension cards within the photos to match the attached log, providing clear scale for the review team.
Please let me know once you have received this log and if you need any clarification on these initial dimensions.
Thank you for your time.
⚠️ Warning: Never send your only copy of the measurement log. Always save a duplicate PDF or physical copy in your own secure claim folder before hitting send. You will likely need to reference these exact numbers multiple times throughout the lifespan of the claim.
Is Your Measurement the Final Word?
It is important to understand that your initial measurements are not always the exact final numbers used to cut a check. Your numbers serve as the strong baseline that allows the desk adjuster to understand the general scope and set initial financial reserves.
Later in the process, a mitigation crew or your general contractor will likely take their own highly precise measurements to finalize the exact material orders for the repair estimate. Your goal during this early documentation phase is simply to bridge the gap between day one and that final professional assessment, ensuring the file does not stall out while waiting for those contractors to arrive.
Final Actions: Locking in the Scale
Recording dimensions is about creating a strong, reliable baseline of facts. Numbers do not panic, and they do not exaggerate. They simply state the physical reality of the damage.
Before you wrap up your initial documentation session, do one final walk-through with your measurement log in hand. Look at the numbers you wrote down and visually verify them against the room one last time. Does that wall actually look like it is 15 feet long? Did you clearly note the ceiling height? A five-minute consistency check at the very end of your documentation process is usually all it takes to catch a transposed number before it becomes a permanent error in the system.
By capturing the macro room size, logging the micro damage footprint, and linking those numbers directly to your photos, you are operating with the discipline of a professional. You are providing the clarity needed to keep the evaluation process moving smoothly and accurately.
❓ FAQ
📐 Why can’t the adjuster just look at my photos to see how big the damage is?
Photos compress depth and remove context. Without a physical reference point or written dimensions, it is nearly impossible for a reviewer to determine if a water stain is the size of a dinner plate or a mattress.
📝 What is the most important measurement to take in a damaged room?
The overall length and width of the entire room is the most critical baseline. Almost all repair estimates rely on knowing the total square footage of the space before addressing specific localized damage.
🏷️ How do I show the dimensions clearly in my claim photos?
Write the measurement clearly on an index card with a dark marker, place the card directly next to the damage, and take the photograph so the number is clearly readable within the frame.
🤔 Do I really need to measure the ceiling height if only the floor is wet?
Yes. Ceiling height combined with floor dimensions gives the total volume of the room. This number is required if mitigation companies need to place air movers or dehumidifiers to dry the space safely.
📏 Should I measure in feet or inches?
Standard practice is to use feet and inches. Whatever you choose, you must write the unit label (ft or in) next to every single number to prevent processing errors.
❌ What happens if I write down the wrong number by mistake?
Simply email your contact with a clear, written correction. State the old incorrect number, provide the new corrected dimension, and ask them to update the file.
🚪 Do I need to measure things that are not damaged, like doors?
If they are part of a continuous affected wall or floor, yes. Openings like doors and windows are often subtracted from the total square footage of a wall when calculating required materials.
📸 What if I already took photos without numbers in them?
You can create a clear written index. List the exact photo file name in your log and type the corresponding measurements next to it so the reviewer can cross-reference them easily.
💧 How do I measure water damage that is hidden behind a wall?
You can only document what is currently visible. Measure the visible moisture lines or stains on the surface. The scope will be updated later if a professional opens the wall and finds more damage.
🗂️ Who should I send my measurement log to first?
Send the completed log directly to your designated desk adjuster, preferably at the exact same time you upload your initial batch of visual evidence to the portal.
⚠️ Disclaimer: PropertyClaimChecklist.com provides practical guidance, process checklists, and example follow-ups to help you organize a property claim and move it forward. It is not policy language, claim documentation, legal content, or a substitute for your insurer's instructions. Always rely on your carrier's requirements and your actual policy terms for what must be submitted and how decisions are made.