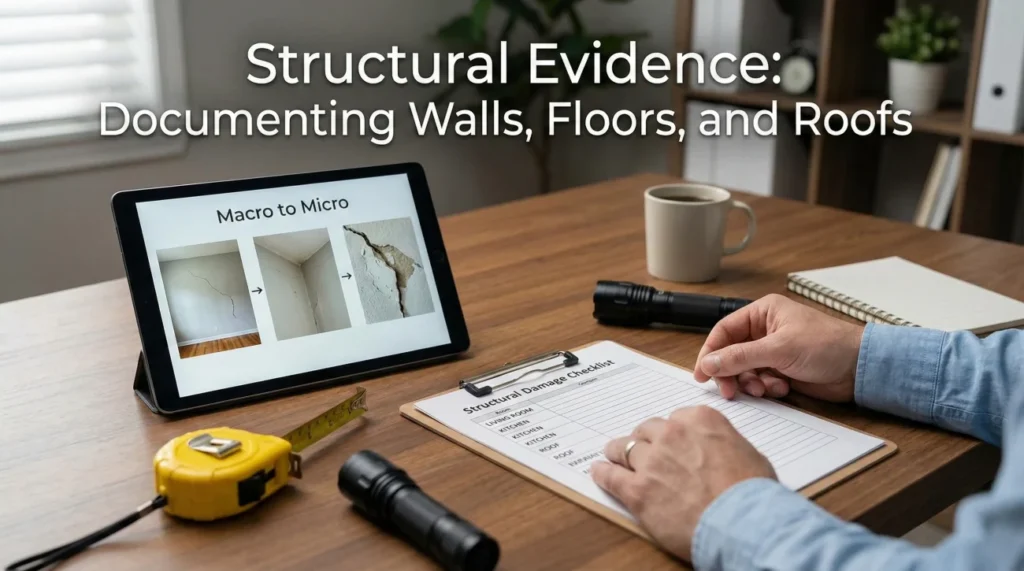
- Always capture structural damage using the “Macro to Micro” method, starting with the whole room before zooming in on specific cracks or water lines.
- Document the exact condition of walls, floors, and roofs before any mitigation crews begin tearing out materials.
- Use common objects like a tape measure or a coin in your close up photos to provide reviewers with an accurate sense of scale.
- Keep structural evidence strictly separated from personal property evidence to prevent confusion during the review process.
- Maintain a chronological timeline log of structural changes, especially if weather or settling causes the damage to spread over time.
The Reality of Documenting Your Home’s Structure
When I review a claim file, the very first place I usually see things fall apart is the structural documentation. It is incredibly common for homeowners to send in dozens of extreme close up photos of water stains, cracked drywall, or lifted floorboards. As a reviewer sitting hundreds of miles away, looking at a tightly cropped photo of a white wall with a crack in it tells me almost nothing. I cannot tell if I am looking at the kitchen ceiling, a bedroom wall, or the foundation.
Gathering structural damage evidence for insurance claim purposes requires a specific mindset. You are not just taking pictures of broken things. You are building a visual map of your home’s integrity so that someone who has never stepped foot on your property can understand exactly what happened, where it happened, and how severe it is.
In my experience handling documentation hygiene, structural damage claims get delayed most often because the evidence lacks context. When reviewers have to guess where a photo was taken or how big a hole actually is, the process slows down. My goal here is to share the exact capture flow I recommend to keep your structural evidence clear, undeniable, and organized from day one.
Defining Structural vs. Contents Evidence
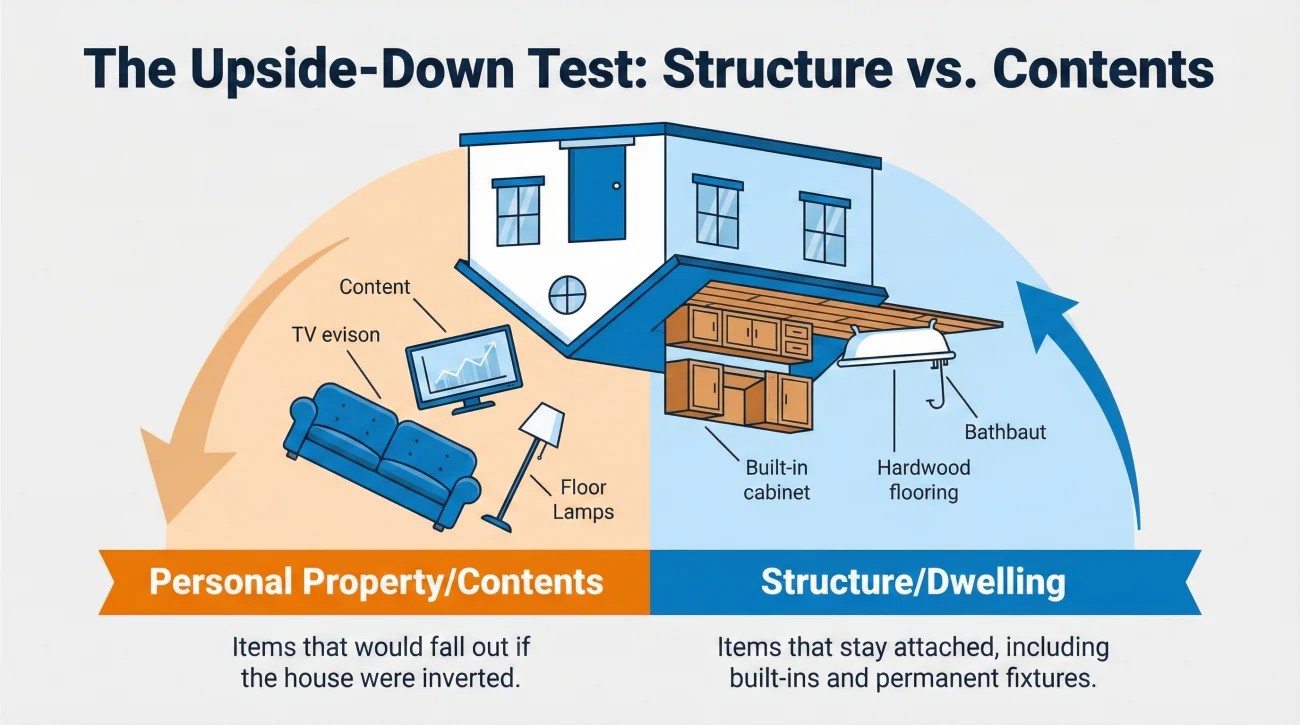
Before you start taking photos, we need to clearly define what structural evidence actually covers. In the claims world, this is often referred to as “dwelling” damage. It is a completely different category from your personal property or contents. Mixing the two in your documentation is a fast way to confuse a file.
A simple rule I use is the “turn the house upside down” test. If you could theoretically turn your house upside down and shake it, whatever falls out is personal property. Whatever stays attached is part of the structure. Your documentation flow for the structure needs to focus entirely on the attached elements.
| Category | Examples (Structure / Dwelling) | Examples (Personal Property) |
|---|---|---|
| Flooring | Hardwood, tile, glued down carpets | Area rugs, loose mats |
| Walls & Ceilings | Drywall, plaster, paint, wallpaper, baseboards | Hanging artwork, mirrors, curtains |
| Fixtures | Built-in cabinets, plumbing fixtures, hardwired lights | Freestanding bookshelves, plug-in lamps |
| Exterior | Roofing, siding, gutters, attached decks | Patio furniture, potted plants |
By keeping your structural damage evidence focused strictly on the dwelling elements, you create a clean package that aligns with how reviewers evaluate the building itself.
The Macro to Micro Capture System

This is arguably the most important operational habit I can share. When you find damage to a wall or a floor, your instinct is to immediately point your camera right at the damage and snap a photo. I highly recommend resisting this instinct. Instead, I teach the “Macro to Micro” progression.
The Golden Rule of Structural Proof:
• Context: Show where the damage is.
• Scale: Show how big the damage is.
• Sequence: Show how it changes over time.
A good structural evidence file tells a story through a sequence of three photos for every damaged area.
- ✅ Step 1 The Establishing Shot: Stand in the doorway of the room and take a wide photo of the entire space. This proves which room you are in and shows the damage in the context of the whole wall or floor.
- ✅ Step 2 The Mid-Range Shot: Walk halfway to the damage. Take a photo that captures the damaged area along with a recognizable landmark in the room, like a window, a door frame, or a built-in cabinet.
- ✅ Step 3 The Close-Up Shot: Now, get close. Take a detailed photo of the specific crack, water line, or broken material. In this shot, always include an item for scale.
A folder containing 50 identical looking close up photos of blistered drywall paint, with no labels indicating which rooms they belong to.
A sequence starting with a wide shot of the primary bedroom, a mid shot showing the west wall, and a close up of the blistered paint next to a tape measure showing it is three feet wide.
This sequence completely removes the guesswork for the person reviewing your file. They know exactly where the damage is located in the house without having to ask you clarifying questions.
The Exterior Capture Flow
When documenting the exterior structure, I always recommend starting from the outside and working your way in. This creates a logical flow of evidence. The exterior is often where the cause of loss originated, so capturing this clearly is vital.
Documenting Roof Damage
The roof is critical, but it is also the most dangerous part of the home to document. You do not need to climb onto a steep or unstable roof to capture structural damage evidence for insurance claim files. In many cases, you can capture highly effective evidence from the ground or from a secure vantage point.
⚠️ Warning: Never prioritize taking a photo over your personal safety. If the roof is damaged, it may be structurally compromised.
Instead of climbing, capture wide shots of the entire roofline from the street and from the backyard. Zoom in on areas where shingles are missing, lifted, or where the roof deck appears to be sagging. If you find blown off shingles or pieces of flashing in your yard, photograph them exactly where they landed before you clean them up. This is a very strong way to prove the force and direction of a weather event.
Siding, Windows, and Foundations
Walk the perimeter of your house systematically. I recommend starting at the front door and walking clockwise around the entire property.
Look for and document the following items using the Macro to Micro method.
First, check the siding for any impacts, missing pieces, or deep water lines. If you have brick or stucco, photograph any new stair-step cracks. Next, photograph every exterior window and door on the damaged side of the home. Look closely at the framing and the seals. Finally, photograph the visible foundation line. Check for pooling water against the slab or new separations between the foundation and the base of the walls.
Here is a mini-scenario to illustrate good exterior documentation. Imagine a heavy storm passes through. A homeowner walks outside and sees siding torn off the side of the house. Instead of picking up the pieces immediately, they take a wide shot of the side of the house showing the missing patch. They take a mid-range shot of the exposed underlying wood. Then, they photograph the torn siding pieces scattered on the lawn, proving the debris matches the missing section. Only after capturing this chain of evidence do they stack the debris neatly for safety.
The Interior Room-by-Room Flow
Once the exterior is documented, move indoors. The biggest mistake people make inside is bouncing randomly from room to room. I highly advise picking a starting point and moving systematically through the house.
Ceilings and Walls
Water damage is the most common structural issue to document indoors. Water travels, so your photos need to track its path. Photograph the ceiling first, looking for sagging drywall, bubbling paint, or brown water rings. Use a tape measure in the photo to show the diameter of the water stain.
Follow the damage down the walls. If drywall is crumbling or peeling, photograph the texture. If you have plaster walls, photograph any spiderweb cracking that has appeared. One critical operational tip I share is to photograph the baseboards. Often, water pools behind the baseboards before it shows up anywhere else. If baseboards are swelling or separating from the wall, capture that gap closely.
Hardwood, Tile, and Carpet
Flooring damage can be deceptive. It might look minor on the surface but hide major structural shifts underneath. When photographing floors, angle is everything. A straight-down photo of a hardwood floor might look completely normal. However, if you place your camera low to the ground and shoot across the surface of the floor toward a light source, buckling and warping become instantly visible.
For tile floors, photograph any cracked grout lines or loose tiles. For glued down carpets, pull up a small corner if it is already loose and photograph the condition of the subfloor underneath, especially if it feels soft or damp.
Key Point: Structural damage is often progressive. The buckling floor you photograph on day one might be noticeably worse a few days later. Date and time stamp every photo, and re-photograph periodically if the condition is worsening. When logging this, be clear in your notes whether you are documenting newly discovered damage or the worsening of an already documented area. This simple distinction prevents reviewers from thinking your story is changing.
Adding a Video Walkthrough for Continuity
While still photos provide the sharpest detail for reviewers to zoom in on, a simple video walkthrough adds undeniable continuity to your evidence map. It helps piece the individual photos together into a cohesive space.
You do not need to film a highly produced documentary. Simply stand at the doorway, state the name of the room out loud, and slowly pan across the structural damage before walking closer to it. Keep the video steady, and use it to show the spatial relationship between the sagging ceiling and the warped floorboards below it. This provides an excellent supplementary overview for your claims file.
Documenting Before the Tear Out
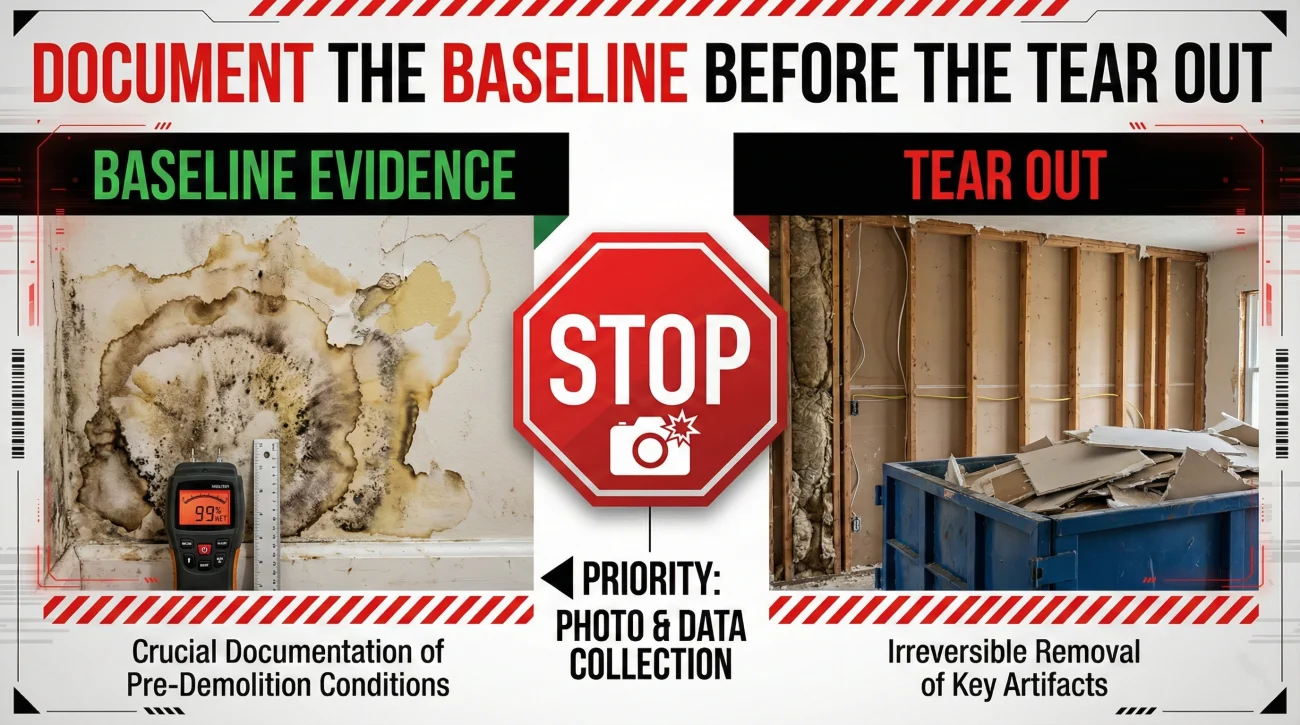
This brings me to a very specific field note based on numerous claims I have reviewed. The single most heartbreaking scenario I see is when a homeowner hires a mitigation or dry-out company to clean up a flood, and the crew immediately tears out all the damaged drywall, insulation, and flooring. By the time the reviewer sees the file, the house is just bare studs and concrete.
The evidence of how high the water reached, how long it sat, and what materials were originally installed is completely gone in a dumpster.
Before anyone swings a hammer, pulls up a floorboard, or cuts into drywall to dry out a room, it is essential to capture the baseline condition. This helps prove what was there before it was destroyed. If a crew is standing in your living room ready to work, politely ask them to pause briefly so you can run your Macro to Micro capture flow on every affected surface.
❌ Note: Never assume the mitigation crew is taking adequate structural photos for your claim file. Their job is to dry the house, not to build your evidence packet. It is always best to own your documentation.
If you discover hidden damage inside a wall during this process, such as rotting studs or old mold mixed with new water, you need to communicate this immediately and document it clearly. Here is a neutral script you can use to ask for guidance when hidden structural damage is exposed.
Subject: Request for guidance on newly exposed structural damage – [Your Name]
Hello,
While the mitigation crew was removing the baseboards in the living room today, we discovered extensive water damage to the bottom foot of the wall studs. I have taken several clear photographs of the exposed framing showing the condition.
Before the crew proceeds with further tear out in this specific area, please provide a written list of any specific documentation or inspections you require regarding these wall studs.
Please confirm receipt of this update.
Thank you,
[Your Name]
This script is polite, shows you are being proactive about preserving evidence, and places the responsibility on them to tell you what they need before the evidence is removed.
Showing Scale and Depth
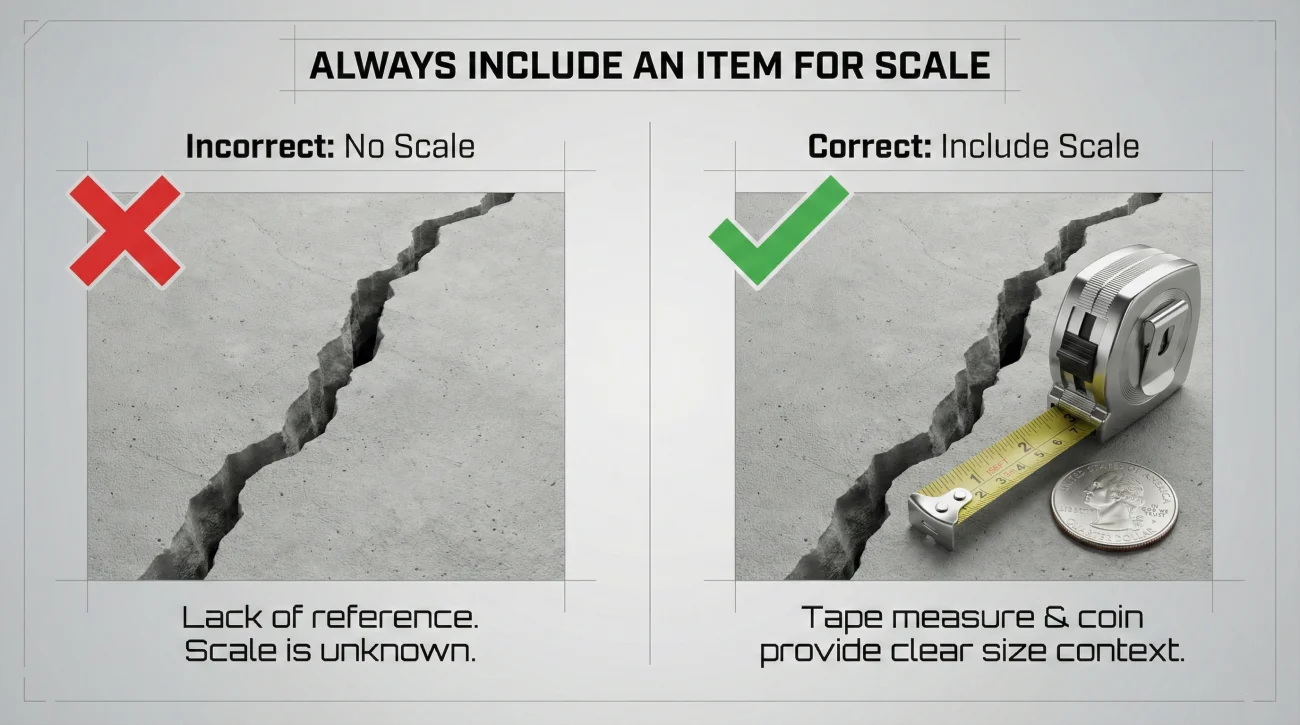
I mentioned using a tape measure earlier, but I want to expand on why this is a fundamental part of organizing proof. Structural elements are large. A crack in a foundation might be two inches wide, or it might be a quarter of an inch wide. Without a reference point, the camera lens distorts reality.
Whenever you are taking a close up shot of structural damage, physically hold a ruler or a bright tape measure right next to the damage. If you do not have one handy, use a common object with a standardized size, like a quarter or a standard pen. Place the item directly beside the crack, the hole, or the water line. This removes all ambiguity.
Furthermore, capturing depth is just as important as scale. If a tree branch has punctured your siding, do not just photograph it from straight on. Take a profile shot from the side to show exactly how deep the puncture goes into the structural cavity.
Integrating Structural Photos into Your System
Taking hundreds of excellent structural photos is only half the battle. If you dump unnamed image files into an email, the reviewer will be overwhelmed, and your file will inevitably face delays. You need a system to organize this proof.
Every structural photo should be transferred to a central folder on your computer. I strongly suggest renaming the files with clear, descriptive labels (e.g., room name and damage type) so they make sense immediately. Your structural damage evidence needs to be carefully filed into your core property claim evidence pack. Keeping your files meticulously organized by room and sequence ensures that when someone asks you for proof of the drywall damage, you can provide the exact photos in seconds without hunting through your camera roll.
Final Thoughts on Structural Proof
Documenting the structure of your home requires patience. It is completely normal to feel overwhelmed when your house is damaged. However, by slowing down, using the macro to micro technique, keeping scale in mind, and ensuring you capture everything before the cleanup crews arrive, you build an undeniable visual record.
Remember that you are the primary custodian of your home’s history right now. No one else will care as much about preserving the exact details of the walls, floors, and roof as you do. Treat every photograph as a distinct piece of evidence, keep your files organized, and always ask for requirements in writing if you are unsure how to proceed with a damaged structural element.
❓ FAQ
🏚️ What counts as structural damage for a property claim?
Structural damage refers to harm done to the physical building itself. This includes the roof, foundation, framing, drywall, installed flooring, windows, and built-in fixtures. Anything permanently attached to the house is generally considered part of the structure.
📸 How do I prove structural damage to my house?
You prove it through a rigorous chronological photo and video record. Use wide establishing shots of the room, mid-range shots for context, and close-ups with a tape measure to show the exact scale and severity of the damaged materials.
🏠 What pictures should I take for roof damage?
Take wide shots of the entire roofline from the ground, zoom in on missing or lifted shingles, and photograph any roofing debris that has fallen into your yard exactly where it landed to show the wind pattern.
🪵 Do I need to keep the damaged flooring?
Always fully document the flooring with photos and video before it is removed. In many cases, it is wise to keep a physical sample of the damaged material (like a piece of the lifted hardwood or soaked carpet pad) in a dry area until the reviewer confirms they do not need to inspect it.
💧 How do I show water damage inside walls?
Photograph the visible signs first, such as bubbling paint, water rings, and swelling baseboards. If a mitigation crew opens the wall, immediately photograph the wet insulation and water marks on the interior wood studs.
🧹 Can I clean up before taking pictures of structural damage?
It is highly recommended that you take comprehensive photos of the damage exactly as it occurred before you sweep up debris, throw away broken fixtures, or start any mitigation tear out.
🪑 What is the difference between personal property and structural damage?
Structural damage affects the attached building materials (walls, floors, roof, built-in cabinets). Personal property damage affects your unattached belongings (furniture, clothing, electronics). They require separate documentation lists.
🧱 How do I document foundation cracks for a claim?
Take a wide shot of the foundation wall, then a close-up of the crack with a tape measure held horizontally across it. Re-photograph the crack periodically with the tape measure to document if the separation is actively expanding.
👷 Who decides if the damage is structural?
The definitions are outlined in the policy language regarding the “dwelling.” When classifying your photos, organize anything permanently attached as a structural evidence file, and allow the assigned reviewer to process it accordingly.
🔍 What if I find more structural damage later?
It is very common to uncover hidden structural damage later in the process. When you find it, stop, document it fully with photos, log the date of discovery, and send a written update asking for further requirements.
⚠️ Disclaimer: PropertyClaimChecklist.com provides practical guidance, process checklists, and example follow-ups to help you organize a property claim and move it forward. It is not policy language, claim documentation, legal content, or a substitute for your insurer's instructions. Always rely on your carrier's requirements and your actual policy terms for what must be submitted and how decisions are made.