- The goal: Provide verifiable documentation that repairs are finished so the adjuster can complete their final review without delays.
- The holdback: Insurance policies often withhold a portion of your settlement (recoverable depreciation) until you prove the work is done. Your completion packet unlocks these final funds.
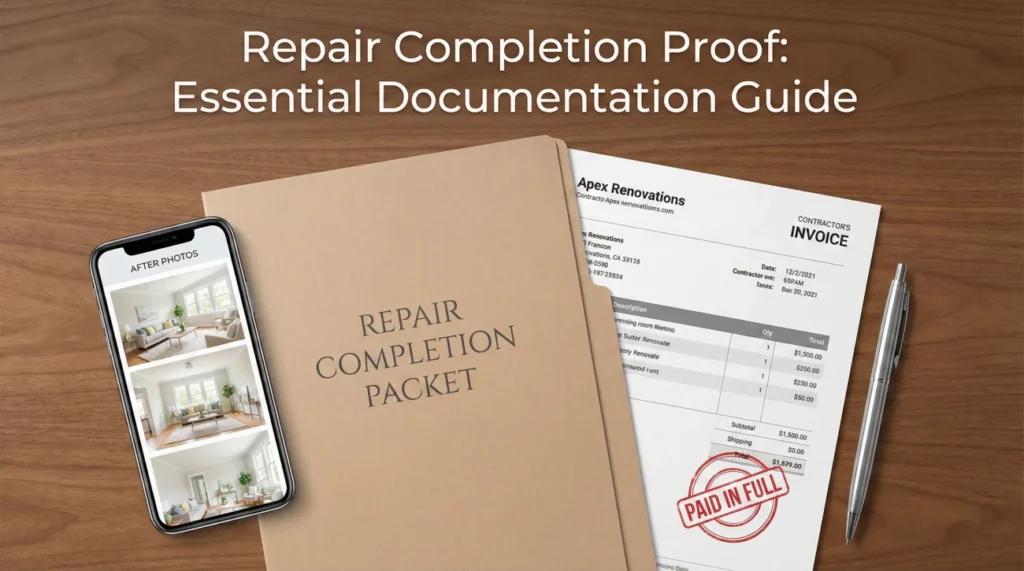
- The method: Combine final contractor invoices, clear “after” photos, and signed completion certificates into a single, organized packet.
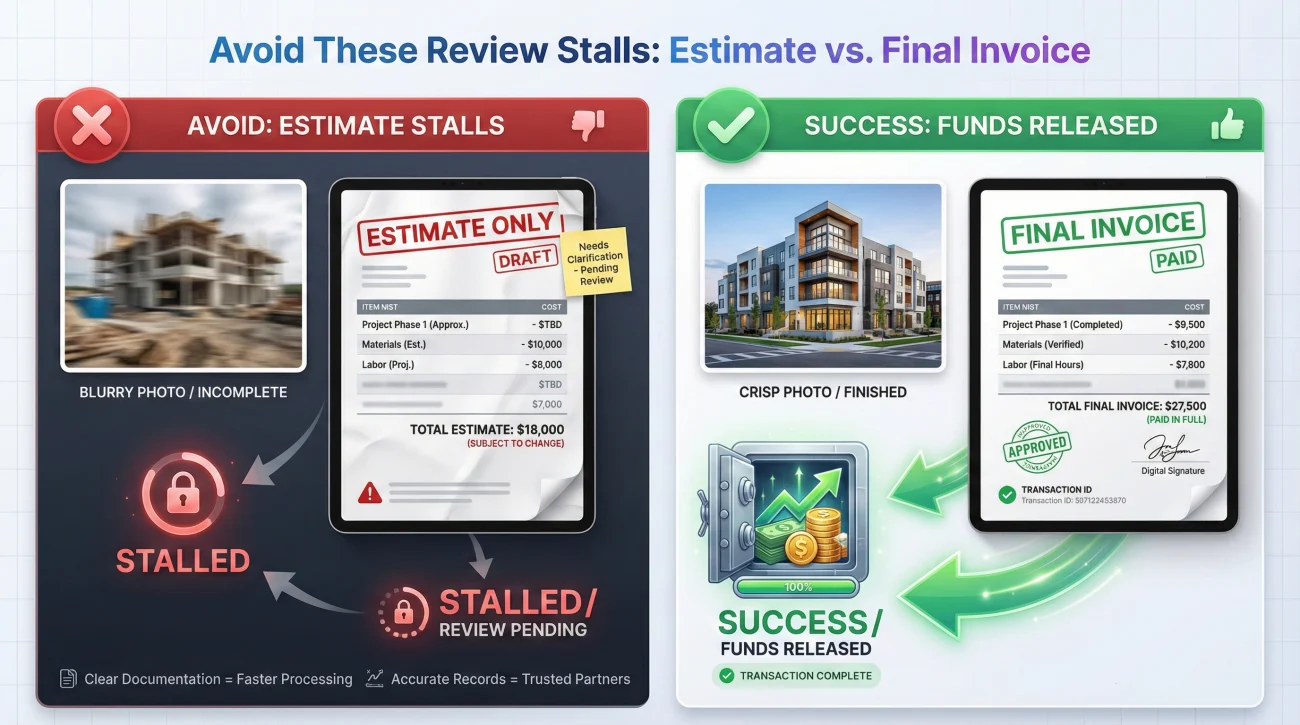
- The hygiene: Rarely submit a working “estimate” as proof of completion. You should submit a document clearly marked as a final invoice.
- The verification: Ensure your completion photos match the exact angles and rooms of your original damage photos for a fast comparison.
The Final Hurdle in Property Claims
In my daily work organizing claim operations, I frequently see a pattern that causes massive frustration for homeowners. The physical work is finally done, the contractors have packed up their tools, and the house looks normal again. The homeowner calls the adjuster, says the work is finished, and expects the final review to close out smoothly. Instead, weeks pass, emails go unanswered, and the file stalls completely.
This happens because telling the adjuster the work is done is rarely enough on its own. The operational reality of a claim file is that an adjuster cannot release final approvals based on a phone call. Their system requires specific, verifiable paper evidence. They need repair completion proof for the insurance claim to move from active to closed.
If you submit the wrong kind of paperwork, or if your photos are unclear, the reviewer has to pause your file and ask for clarification. Every time that happens, you lose days or even weeks.
In this guide, I will walk you through exactly what documents you need to gather, how to format your completion photos, and how to package this evidence so the final review process moves forward smoothly.
Key Point: The final stage of a claim is entirely about documentation. Your goal is to make it as easy as possible for the reviewer to verify that the work listed in the original scope has been physically completed.
Understanding Recoverable Depreciation (The Holdback)
Before gathering your files, it helps to understand why the insurer needs this proof. In many standard policies, the insurance company does not pay the entire replacement cost upfront. They pay the Actual Cash Value (the depreciated amount) first, and they hold back the remaining amount. This holdback is called recoverable depreciation.
The insurer retains these funds to ensure the money is actually used to repair the property, rather than being pocketed. Submitting your repair completion proof is the specific operational trigger that unlocks this held-back money. The reviewer is looking at your evidence for one reason: to confirm that the costs incurred and the work performed match the original approved scope, allowing them to release the final check.
The Core Checklist for Repair Completion Proof
When you are preparing to submit your final evidence, you need to think like an auditor. The reviewer is going to look at your original approved scope of work and compare it directly to what you submit now. If there are gaps, the file stalls.
Here are the core pieces of documentation you should collect from your contractor and your own records before you declare the work finished.
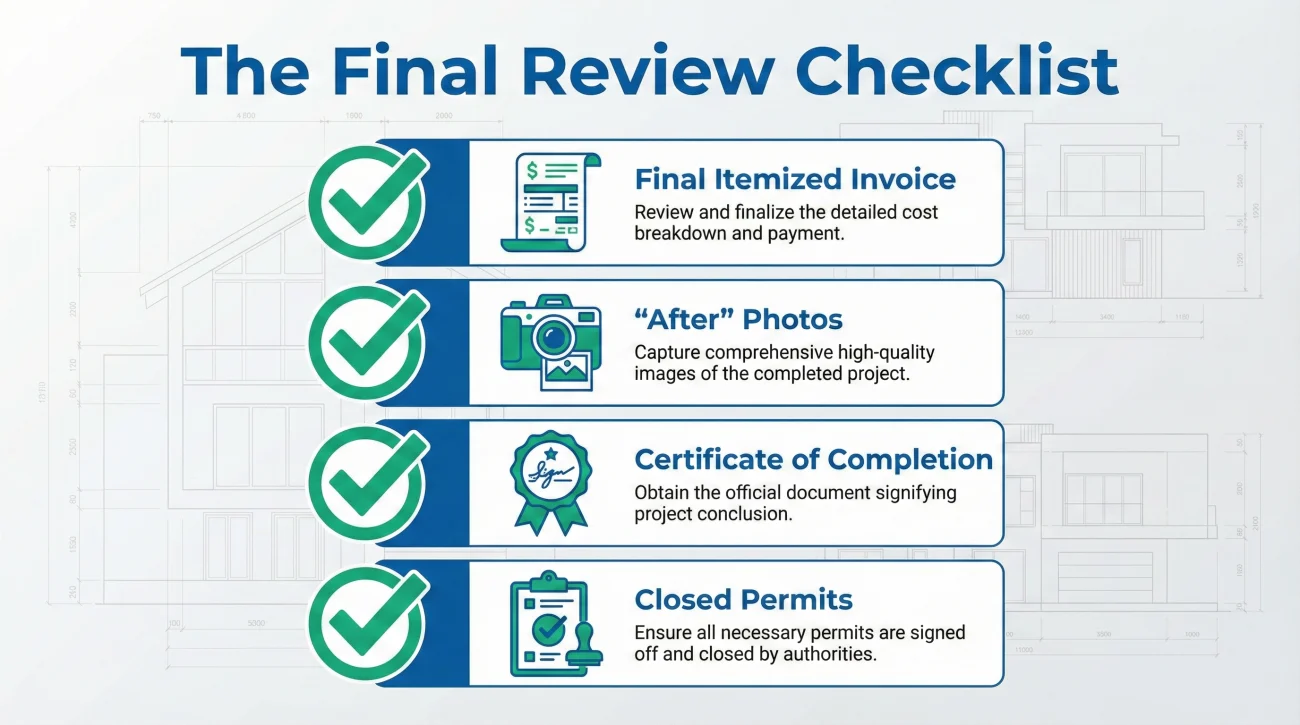
1. The Final Itemized Invoice
This is one of the most reliable documents in your completion packet. A common mistake is sending the contractor’s “estimate” or “proposal” as proof of completion. An estimate only proves what you planned to do. A final invoice proves what was actually done and billed.
Your final invoice needs to be detailed. It should ideally break down the work in a way that roughly mirrors the adjuster’s original scope. Furthermore, it must clearly indicate the payment status. It should say “Final Invoice” at the top and show the total amount billed. If you have already paid it, it should show a zero balance or be stamped “Paid in Full.”
If Your Contractor Refuses to Itemize
Sometimes, a contractor will push back against providing a line-by-line invoice, preferring a simple lump sum. If your contractor refuses to itemize every single nail and board, ask them for a “final invoice with a scope summary.” At a bare minimum, this document must include a room and trade breakdown (for example, “Kitchen Drywall” and “Kitchen Plumbing”), along with a signed statement declaring that the agreed-upon scope of work has been fully completed.
2. The “After” Photos
Photographic evidence is strongly recommended for a smooth review. However, taking random pictures of a finished room is often unhelpful. The most effective “after” photos are those that recreate the exact angles and perspectives of your original damage photos.
If your initial evidence showed a collapsed ceiling from the doorway, your completion photo should show the repaired ceiling from that exact same doorway. This creates a simple, visual before and after comparison that any reviewer can quickly verify.
3. Certificate of Completion
Many professional restoration and repair companies will ask you to sign a Certificate of Completion or a Certificate of Satisfaction when they finish the job. This is a formal document stating that the contractor has fulfilled their obligations and the homeowner accepts the work.
Always ask for a copy of this signed document. Including it in your packet provides a strong, formal signal to the adjuster that the physical labor phase of the claim is officially over.
4. Closed Permits and City Inspections
If your repairs required structural work, electrical upgrades, or major plumbing, your local municipality likely required a permit. In these cases, the adjuster will often want to see that the permit was not just pulled, but officially closed out and passed by a city inspector.
Gather the final inspection reports or the signed-off permit card. This proves that the work was completed up to local building codes, which is a requirement for many final reviews.
💡 Pro Tip: Keep all these documents centralized. Creating a single, well-organized evidence folder is a core principle of a reliable property claim evidence pack.
Packaging Rules: How to Submit Your Evidence
Gathering the right documents is only half the battle. How you present them dictates how fast they get reviewed. I have seen homeowners forward 15 separate emails from their contractor directly to the adjuster, with no context and no labels. This often delays review.
When an adjuster opens a chaotic email thread, they have to spend time downloading, renaming, and sorting every file before they can even begin their review. You want to do that work for them.
Consolidate the Paperwork
Do not send four different image files of an invoice. Use a free scanner app on your phone or a PDF merger tool to combine the Final Invoice, the Certificate of Completion, and the Closed Permits into a single, clean PDF document. Name this file clearly, such as “Claim_12345_Final_Invoices_and_Permits.pdf”.
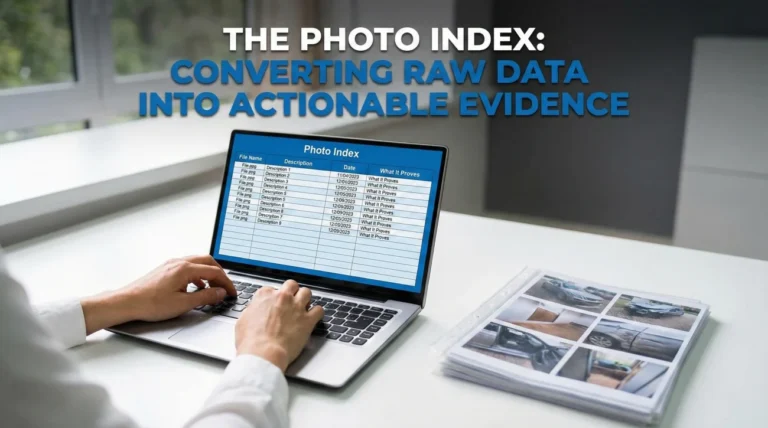
Create a Photo Index
If you have more than five completion photos, do not just attach them loosely. Paste them into a simple text document, label them by room and specific angle to match your original damage photos, and save that document as a PDF. This ensures the reviewer knows exactly what they are looking at without guessing.
The Cover Sheet Concept
Your submission email should act as a cover sheet. It needs to list exactly what is attached so the reviewer can check it off their internal list immediately.
Common Mistakes That Stall Final Reviews
Even with the best intentions, it is easy to make a small paperwork error that halts the entire process. By understanding these common traps, you can audit your own submission before you hit send.
One frequent issue is the confusion between an estimate and an invoice. To the untrained eye, they look very similar, but they serve completely different legal and operational purposes in a claims workflow.
| The Document | What It Says | How the Adjuster Views It |
|---|---|---|
| The Estimate | “Proposal,” “Quote,” “Estimated Total” | Does not prove work was done. Shows intent only. Often rejected for final completion proof. |
| The Final Invoice | “Invoice,” “Final Bill,” “Balance Due,” “Paid in Full” | Proves the work was billed and completed. Generally accepted as evidence for final review. |
Another common mistake is sending unreadable photos. Sometimes people take photos in a dark room, or they take a photo from so far away that the repaired drywall looks like a blurry white square. Your photos must be well-lit and clearly show the finished surface. If you cannot clearly see the repair in the photo, the reviewer cannot either.
❌ Note: Never assume the contractor sent the documents to the adjuster for you. Even if they promise to do so, it is your claim and your responsibility. Always ask the contractor to send the final documents to you, and then you submit them to the adjuster.
A Mini-Scenario: What a Smooth Submission Looks Like
To see how this all comes together, let us look at a practical, everyday scenario. Imagine a homeowner who recently had their kitchen floors and lower cabinets replaced after a pipe leak.
The contractor finishes the final trim work on a Tuesday. Before the contractor leaves, the homeowner asks for the Final Invoice. The contractor emails a PDF that clearly states “Final Invoice for Kitchen Repairs” and shows the total amount. The homeowner then stands in the exact three spots where they took their original damage photos and takes three clear, brightly lit “after” photos.
That evening, the homeowner does not just forward the contractor’s email. Instead, they save the invoice to their computer. They insert the three photos into a document, label them “Kitchen Floor Finished,” “Lower Cabinets Installed,” and “Baseboards Painted,” and save that as a PDF.
Finally, they write a clear, neutral email to the adjuster, attaching just those two cleanly named PDF files. Because the submission is well-organized, the adjuster opens the file on Wednesday morning, verifies the invoice matches the scope, sees the clear visual proof, and moves the file to the final approval stage quickly.
This is the power of organized evidence. It reduces back-and-forth communication.
Handling Partial Completions
In many large-scale repairs, the work does not finish all at once. The roof might be done in October, but the interior drywall might be waiting on a subcontractor until November. This creates a situation called partial completion.
You do not always have to wait until every single nail is driven to submit proof of completion. Many times, you can submit repair completion proof for the insurance claim in phases. If the roof is completely finished and billed, you can ask your contractor for a dedicated “Roofing Final Invoice” and submit that alongside the roofing completion photos.
When doing this, clarity is paramount. You must explicitly state in your communication that this is partial proof for a specific trade, and that the rest of the work is ongoing. If you simply say “Here is the final invoice,” the adjuster might mistakenly think the entire claim is done, which can cause avoidable miscommunication regarding your remaining scope.
“The guys finished today, here are the invoices.”
“The exterior roofing phase is now complete. Please find attached the final invoice and photos for the roof only. Interior repairs are still ongoing.”
The 10-Minute Final Packet Audit
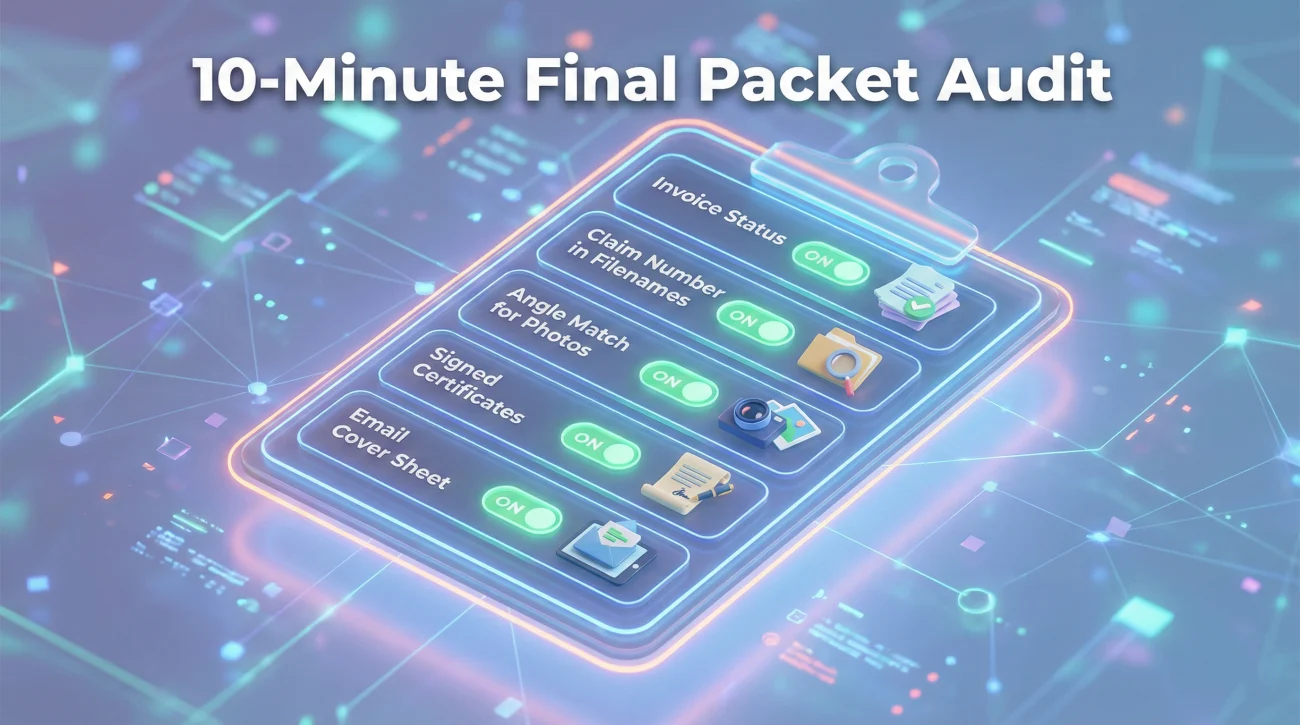
Before you click send on your final email, take ten minutes to review your packet. A quick self-audit is one of the best ways to prevent your file from bouncing back to you.
- ✅ Invoice Status: Does the document clearly say “Final Invoice” and show a balance or paid status?
- ✅ Naming Conventions: Is your claim number included in the PDF filenames?
- ✅ Angle Match: Are your “after” photos shot from the exact same angles as the initial damage photos?
- ✅ Permit Check: If your project required city permits, are the closed or signed-off permit documents included?
- ✅ Signatures: Is the Certificate of Completion signed and dated by both you and the contractor?
- ✅ Context Labels: Does your photo index include clear room and angle labels?
- ✅ Cover Sheet: Does the body of your email clearly list every document you have attached?
Copy-Paste Scripts for Submitting Completion Proof
Keeping your communication neutral and highly structured prevents misunderstandings. When you send your evidence, use a clear subject line and bullet points to list your attachments.
Script 1: Submitting the Final Completion Packet
Use this when all work is 100% finished and you are submitting the complete set of documents.
Subject: Claim # [Your Claim Number] – Repair Completion Proof and Final Invoices
Hello [Adjuster Name],
I am writing to confirm that all repairs related to this claim are now complete.
To assist with your final review, I have attached the following documents:
– The final, itemized contractor invoice.
– The signed Certificate of Completion.
– A PDF containing the “after” photos of the repaired areas.
Please review these files and let me know if you need any additional documentation to process the final review and release the remaining funds.
Thank you,
[Your Name]
Script 2: Submitting Proof for a Partial Completion
Use this script if one major phase of the project is done, but other trades are still working.
Subject: Claim # [Your Claim Number] – Partial Completion Proof (Roofing Only)
Hello [Adjuster Name],
I want to provide an update on the repair progress. The [insert trade, e.g., roofing] portion of the scope is now 100% complete.
I have attached the final invoice and completion photos specifically for the [roofing] work. Please note that the [insert remaining work, e.g., interior drywall] repairs are still ongoing.
Could you please review this partial completion proof and advise on the next steps for this portion of the file?
Best regards,
[Your Name]
Script 3: The 7-Day Follow-Up
If you submit your completion packet and hear nothing for a week, you need to trigger a confirmation loop. It is a file reality that documents can sometimes be misplaced in busy portals.
Subject: Claim # [Your Claim Number] – Status update on completion documents
Hello [Adjuster Name],
I am following up on the repair completion documents I submitted on [Date].
Could you please confirm that you received the final invoice and photos, and let me know if my file has everything needed to finalize the review?
Thank you for your time,
[Your Name]
Final Thoughts on Releasing Your File
Submitting repair completion proof for an insurance claim is an exercise in organization. You are building a factual, verifiable bridge between the damage that was approved and the repairs that were executed. By prioritizing final invoices over estimates, matching your photo angles, and consolidating your files into clean PDFs, you make the review process as simple as possible.
Maintain your file hygiene right up until the very end. Keep copies of every final document, log the dates you send them, and always use polite, written follow-ups to ensure your paperwork does not get buried. When you control the quality of the evidence you submit, you maintain control of your claim timeline.
❓ FAQ
📸 How do I prove my repairs are finished?
The standard way to prove completion is to submit a combination of the final contractor invoice, clear “after” photos of the repaired areas, and any required signed completion certificates or closed municipal permits.
📄 What documents do I need for recoverable depreciation?
To trigger a final review, you usually need to provide the final invoice showing the work was billed, along with photographic evidence that the scope of work was physically completed at the property.
🧾 Does the insurance company need a final invoice?
In most cases, yes. An estimate only shows what you planned to spend, while a final invoice proves what was actually billed and completed. Reviewers rely on the final invoice to verify the work.
🖼️ Can I just send pictures of the finished work?
Pictures alone are rarely enough. While they prove the physical condition of the property, the adjuster generally needs the financial documentation (the invoice) to verify that the costs align with the approved scope.
🏦 Do I need to show canceled checks to my insurance?
Some adjusters may ask for proof of payment, like a canceled check or a bank statement, if the invoice itself does not clearly state “Paid in Full.” Having these ready is a good backup plan.
🏗️ What if my contractor hasn’t pulled the final permit yet?
If a permit was required, the file review might stall until the city officially signs off. You should communicate clearly with your contractor to prioritize closing the permit so you can submit the final paperwork.
⏳ How long does it take for insurance to review repair proof?
If your completion packet is highly organized and matches the original scope perfectly, a review can often happen within a few business days. Disorganized or missing files are typically a common cause of delays.
🔨 What happens if I did the repairs myself?
If you completed the work yourself, you will generally need to submit receipts for all materials purchased and provide highly detailed “after” photos. Policies vary greatly on this, so always ask your adjuster what specific proof they accept for self-performed labor.
📋 Do I need to send proof for every single line item?
Your documentation needs to broadly cover the approved scope. While you do not need a photo of every single nail, you should provide invoices and photos that prove the major categories of work (like flooring, drywall, or roofing) were finished.
✉️ How do I write an email asking for my final claim review?
Keep it simple and direct. State that all repairs are complete, list the specific documents you have attached (invoice, photos), and politely request that they review the file for final processing.
⚠️ Disclaimer: PropertyClaimChecklist.com provides practical guidance, process checklists, and example follow-ups to help you organize a property claim and move it forward. It is not policy language, claim documentation, legal content, or a substitute for your insurer's instructions. Always rely on your carrier's requirements and your actual policy terms for what must be submitted and how decisions are made.