- Prioritize your safety first. If an item is a severe health hazard, document it from a safe distance before removal.
- Use a minimum viable proof approach (one wide shot, one identifying tag) when rushed, or the ideal three-shot sequence for high-value items.
- Create a written disposal log that connects the discarded item to your main evidence index so reviewers know exactly what was lost.
- Always communicate your intent to discard hazardous or rotting items in writing, providing your documentation to the reviewer at the same time.
The Urgency to Clean vs. The Need for Proof
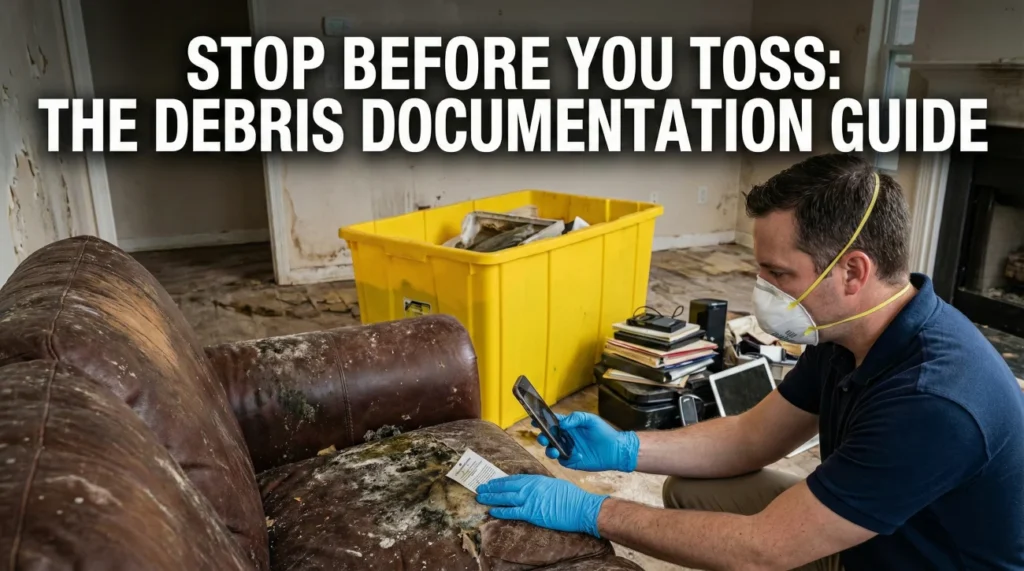
When you are standing in a room full of ruined, soaked, or shattered belongings, your first instinct is usually to start throwing things away. You want the mess gone. You want the smell out of your house. It is a completely normal human reaction to a stressful event. However, in my years working in claims operations, I have seen this exact instinct cause massive delays and frustrated denials.
The gap between what you know was ruined and what you can prove was ruined often happens at the edge of the dumpster. If an item is discarded before it is properly documented, it essentially disappears from the record. When a reviewer asks about the item weeks later, having to say “I threw it away” without accompanying proof creates a hard stop in the process. Knowing exactly what to photograph before throwing away property is one of the most reliable ways to bridge this gap safely.
I always tell people that you are not just throwing out trash; you are potentially throwing out evidence. In this guide, I will walk you through a practical system for documenting debris, soft goods, and unsalvageable building materials before you let them leave your property. The goal is simple. We want to allow you to clean up your home while maintaining a clear, defensible record of what was lost.
When Does Property Become Debris?
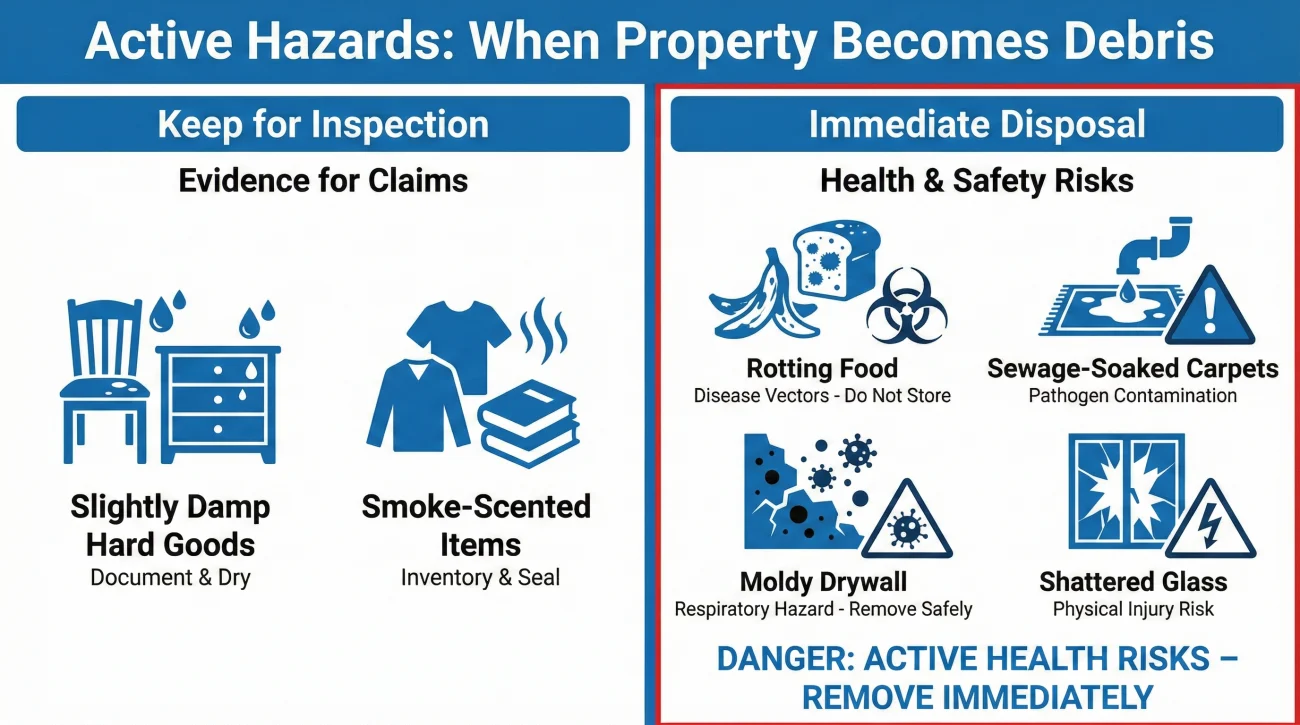
Before we look at the camera lens, we need to define what we are actually doing. Not everything should be thrown away immediately, even if it is badly damaged. The general rule of thumb in property documentation is to keep items on-site for a physical inspection whenever safely possible. Please note that carrier requirements and individual policy terms vary, so it is always a good idea to confirm your duties after a loss in writing.
However, operational reality dictates that some things simply cannot stay. Rotting food in a warm refrigerator, sewage-soaked carpets, heavily moldy drywall, or shattered glass present active health and safety hazards. These items transition rapidly from damaged personal property to hazardous debris.
Always prioritize your safety first. Do not put yourself at risk of injury or infection just to get a photograph. If a situation is dangerous, document what you safely can from a distance.
Often, a file lands on a desk with a massive gap between the photos provided and the inventory list claimed. The homeowner threw away a ruined mattress on day one because it was soaked and smelling, but they only added it to their spreadsheet on day thirty. Without a photo connecting the spreadsheet to the reality of day one, the review process stalls. Your job is to freeze the scene digitally before you physically alter it. You need to build a comprehensive property claim evidence pack that covers even the items that are no longer in the house.
Key Point: Do not rely on memory to document what you threw away. Memory fades, but properly captured and logged digital files provide a permanent record.
The Priority Capture List: What Needs Photographing
Not all items require the same level of photographic detail, but all discarded items require a baseline of proof. I break down the documentation process into three main categories based on what I commonly see causing friction in a file.
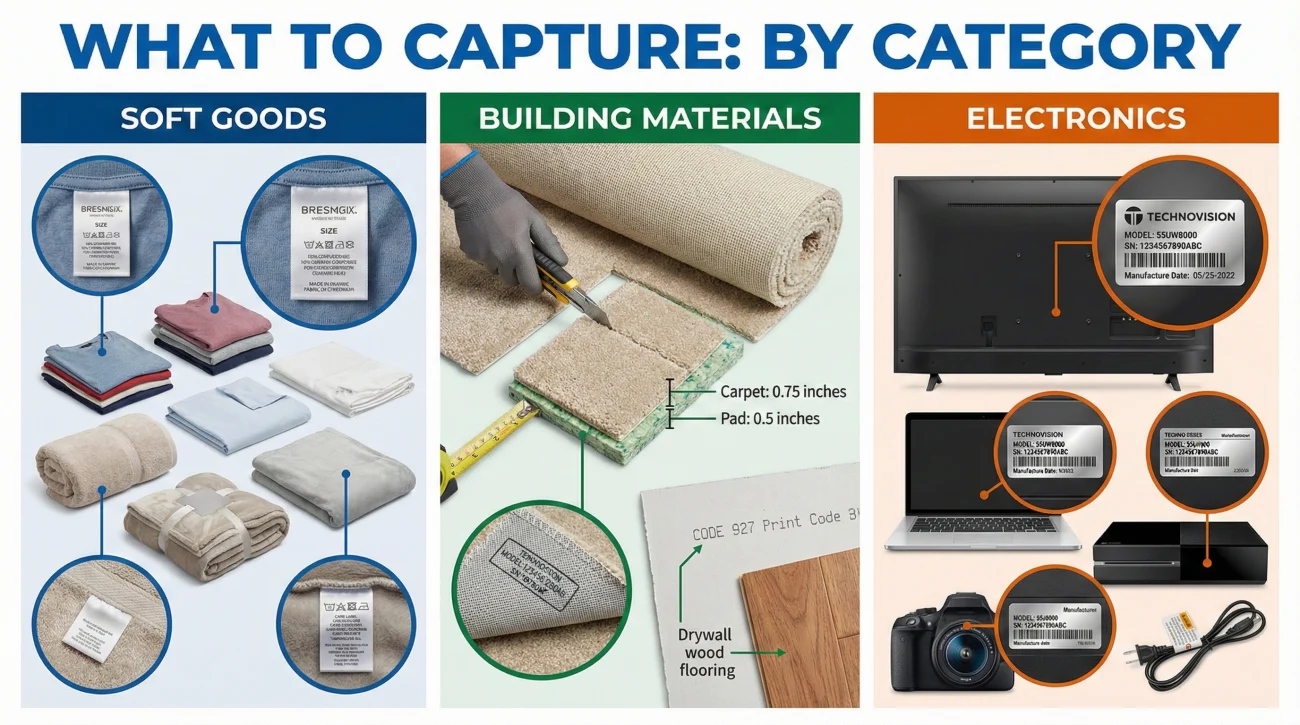
1. Soft Goods and Perishables
These are the items most frequently thrown away first. This includes clothing, bedding, area rugs, upholstered furniture, and food.
For food, open the refrigerator or pantry and take wide shots of the shelves to establish the overall quantity. You do not need a macro shot of every single condiment. Just capture close-ups of a few high-value items like expensive cuts of meat, specialty ingredients, or large quantities of stored dry goods. For clothing and textiles, do not just photograph a black garbage bag full of fabric. Before bagging, spread the items out or photograph the pile while the items are identifiable. If it is a high-value piece of clothing, capture a quick photo of the brand tag.
2. Unsalvageable Building Materials
This includes ripped-up carpet pad, ruined laminate flooring, or saturated drywall that had to be cut out to prevent mold. Many people tear these out and toss them into a bin immediately.
Instead, if it can be done safely, lay a representative piece of the material flat. If you are tearing out carpet and padding, cut a small, clean sample of the carpet and the pad underneath. Photograph the top, the backing, and any brand markings or thickness indicators. You can throw the rest of the ruined room away, but this representative swatch, along with the photos of it, will help prove exactly what grade of material was removed.
3. High-Value Irreparables
Televisions exposed to water, computers crushed by debris, or appliances shorted out by surges hold significant weight in a review file.
It is a best practice to capture the make, model, and serial number before these go out the door. A photo of a crushed black rectangle is just a crushed black rectangle. A photo of the manufacturer sticker on the back of that rectangle is actionable evidence.
- ✅ Capture the wider context (the item in the damaged room).
- ✅ Capture the specific identity (brand tags, model stickers).
- ✅ Capture the cause for disposal (the visible mold, the shatter, the water line).
Minimum Viable Proof vs. Ideal Proof
When you are documenting an item destined for the dumpster, you might feel pressured to take dozens of perfect photos. In a disaster zone, perfection is rarely possible. Let us break this down into a practical framework so you do not get overwhelmed.

The Minimum Viable Proof
If you are exhausted, if the environment is difficult, or if you are dealing with hundreds of low-value items, aim for the minimum. Minimum viable proof consists of one wide context shot showing the item damaged in the room, plus one identifying shot such as a brand tag or front label. Doing this is infinitely better than throwing the item away with zero documentation. It gives the reviewer a starting point.
The Ideal Proof (The 3-Shot Sequence)
For high-value items, or when you have the time and safety to do it right, the ideal standard is a three-shot sequence. In day-to-day claims operations, the fastest wins usually come from files where the reviewer has zero doubts about what they are looking at.
First, take the Wide Context Shot. This shows the item in its environment, demonstrating the damage event. Second, take the Medium Identifying Shot. This shows the whole item clearly, proving its size, shape, and general quality. Finally, take the Macro Data Shot. This is the close-up of the manufacturer tag, the serial number plate, the fabric care label, or the deep structural damage.
A common mistake I see is capturing only the damage without capturing the identity of the item. A tight, blurry photo of torn fabric does not prove you owned a specific brand of sofa. It only proves you have a photo of torn fabric.
Taking a single blurry photo of a pile of wet clothes shoved into a trash bag, with no identifiable brands or quantities visible.
Laying out the primary ruined garments, taking a wide shot of the group, and taking close-up shots of the brand tags of the most expensive coats before bagging them up.
Mapping: How Reviewers Connect Photos to Your Inventory
Why is all this photographic discipline so important? In claims operations, we look for a clean, logical trail. When a reviewer opens your file, they are trying to connect three distinct pieces of information: the photos you sent, the disposal log line item, and your main inventory spreadsheet.
If you list “Leather Sofa” on your inventory but threw it away on day two, the reviewer needs to know where to look to verify it. By logging the item properly, you give them the exact photo file numbers. They check your log, pull up file “IMG_305”, see the leather sofa covered in mold, and can easily approve the line item.
Without that map, the photos are just a disorganized pile of images. Reviewers cannot and will not guess which ruined item matches which line on your spreadsheet. You have to draw the lines for them. Mapping your evidence is what transforms a chaotic folder of pictures into a professional, easily approved claim file.
Creating Your Debris Disposal Log
Taking the photos is only the first half of the documentation discipline. The second half is logging what you did. If you send a reviewer fifty photos of ruined items and tell them “I threw all this away,” they now have to spend hours guessing what is in the photos.
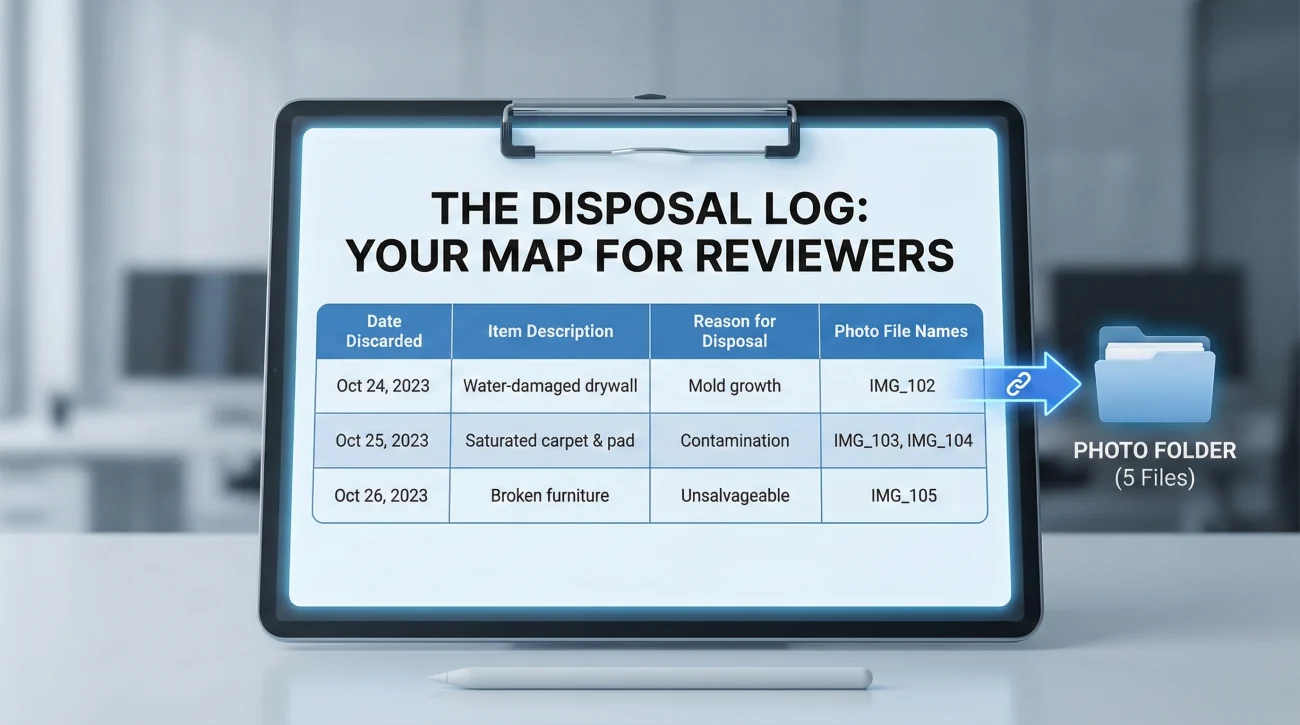
To prevent this, you should maintain a simple Disposal Log. This is a running list of what left the property, when it left, and why it could not stay. This log serves as a bridge between your photo index and the physical reality of your home. It shows a highly organized, professional approach to your documentation.
| Date Discarded | Item Description | Reason for Disposal | Photo File Names |
|---|---|---|---|
| Oct 12, 2024 | Samsung Refrigerator Food (Full) | Spoiled, power outage 4+ days, active odor | IMG_102, IMG_103, IMG_104 |
| Oct 13, 2024 | Primary Bedroom Carpet & Pad | Category 3 water saturation, health hazard | IMG_215, IMG_216, IMG_217 |
| Oct 14, 2024 | Sectional Sofa (Living Room) | Mold growth on base, unsalvageable | IMG_305, IMG_306 |
💡 Pro Tip: Keep this log running chronologically. If you rent a dumpster, keep the receipt for the dumpster rental in the same folder as this log, as debris removal itself is often a documented expense.
How to Communicate Debris Removal
One of the most frequent points where files go sideways is the lack of communication regarding discarded items. You should never secretly throw things away and hope nobody asks. Transparency is your best tool. You want to control the narrative by informing the reviewer that you are actively mitigating hazards, not deliberately destroying evidence.
Once you have taken your photos and updated your disposal log, it is good practice to send a written update. You are not necessarily asking for permission to throw away rotting food, as common sense dictates it must go. Instead, you are creating a written trail that proves you acted responsibly and maintained evidence.
Hello [Name],
I am writing to provide an update on the property. Due to active mold growth and safety hazards, we had to dispose of several items over the weekend, including the saturated living room carpet and ruined soft goods.
Before disposing of these items, we fully documented them. I have attached the Disposal Log detailing exactly what was removed, along with the corresponding photo evidence showing the damage, brands, and context.
Please confirm receipt of this log and the attached photos so I know the file is up to date.
Thank you,
[Your Name]
Common Debris Documentation Mistakes
In many cases, well-meaning people try to document their debris but make structural errors that render the photos much less useful. Here are the most common patterns I see that cause timelines to slip.
The “Dumpster Group Photo”: Waiting until everything is piled inside a dark dumpster to take a single photo from the top down. Reviewers cannot determine quantity, brand, or specific damage from a compressed pile of trash. You must photograph items before they go into the pile.
Missing the Model Numbers: Tossing a ruined window air conditioner unit but only taking a photo of the front grill. The front grill does not confirm the BTU capacity or the brand. Always hunt for the metallic sticker or stamped plate with the data.
Throwing Away the Swatches: Ripping out all the baseboards or flooring and discarding everything. Even if you take photos, it is highly recommended to keep a small, physical sample of the material in a clean dry bag in the garage, when practical. If there is ever a dispute about the material grade, you have the physical proof.
❌ Note: Never assume that a reviewer will simply take your word for it just because the damage was severe. Always assume they need to see exactly what you saw before you threw it away.
Field Notes: Three Common Disposal Scenarios
To see how this works in practice, let us look at three typical scenarios where proper documentation makes or breaks the timeline.
Case 1: The Missing Mattress
Imagine a pipe bursts, soaking a finished basement bedroom. The mattress on the floor is ruined, heavy with water, and starting to smell. The homeowner knows it has to go.
A poor process looks like this. The homeowner drags the mattress to the curb, the municipal trash picks it up, and two weeks later the homeowner writes “Queen Mattress” on their spreadsheet. The reviewer asks for proof. The homeowner has nothing but a photo of an empty, wet room.
A good process looks like this. Before dragging it out, the homeowner takes a wide photo showing the mattress soaked in the room. They take a close-up photo of the mattress brand label. They drag it to the curb and log it on their Disposal Log. When they submit their evidence, the reviewer immediately sees the item, verifies the brand, understands the damage, and the file moves forward smoothly.
Case 2: The Mystery Electronics
A homeowner whose basement flooded had a large window air conditioning unit short out in the water. They took a quick photo of the unit sitting in the puddle, then dragged it to the curb for heavy trash pickup. Two months later, they claim a 12,000 BTU smart-enabled unit.
The adjuster looks at the photo, which only shows a generic white plastic front grill. Because the homeowner did not photograph the side manufacturer sticker before throwing it away, the adjuster can only verify a standard, low-tier unit based on the visual. Taking one macro shot of that sticker would have prevented the dispute entirely.
Case 3: The Flooring Grade Dispute
A family had to tear out buckling hardwood floors immediately to prevent severe mold. They took a few wide photos of the ripped-up wood in a pile and threw it in a dumpster. During the estimate phase, the family claims premium solid oak flooring.
The reviewer, looking at a blurry photo of a wood pile, writes the estimate for basic builder-grade laminate. Because the physical wood is gone and no small swatch was saved, the family struggles to prove the original quality. Keeping one clean board as a physical sample in the garage would have saved weeks of frustrating negotiation.
Final Thoughts on Debris Management
Managing the physical aftermath of property damage is exhausting. The physical labor of carrying out ruined items is hard enough without the added mental weight of documentation. However, maintaining your documentation discipline during the cleanup phase is one of the most critical things you can do for your file.
Take the extra sixty seconds per item to capture your evidence, and write it down in your log. It may feel tedious in the moment while you are trying to clean, but that brief pause to capture proof is exactly what prevents endless email chains and missing evidence reports weeks down the line.
❓ FAQ
🛋️ Can I throw away damaged furniture after a flood?
You can usually discard items that pose an active health hazard, like moldy or sewage-soaked furniture. However, you should thoroughly photograph the item in the room, capture any brand tags, and log the disposal before removing it, provided it is safe to do so.
🗑️ What happens if I threw away ruined items before taking pictures?
If you discarded items without photos, proving their existence and condition becomes much harder. You will need to rely on secondary evidence like old family photos showing the room, original purchase receipts, or credit card statements to verify you owned the items.
📺 Do I need to keep the serial numbers of thrown away electronics?
Yes. Taking a clear, close-up photograph of the manufacturer sticker, which includes the model and serial number, is crucial. This proves the exact specification of the ruined electronic device before it goes into the trash.
📸 How many pictures should I take before throwing things out?
Aim for a minimum viable proof of two photos per item: a wide shot for context and a close-up for identity. For ideal proof on high-value items, take three: a wide shot, a medium shot, and a macro close-up of the tags.
✂️ Should I keep a sample of my damaged carpet?
Yes, it is highly recommended. Cut a clean, small square of the carpet and the padding underneath. Keep this physical sample in a dry place, and photograph it thoroughly before discarding the rest of the ruined flooring.
🥩 What do I tell my adjuster if I have to throw away rotting food?
Communicate in writing that due to spoilage and health hazards, you had to clear the refrigerator or pantry. Provide them with the wide shots of the interior shelves, close-ups of a few high-value items, and an itemized disposal log.
🚧 Can I put damaged items on the curb before the inspection?
If the items are creating a hazard inside, you often have to move them outside. If they must go to the curb, ensure you have completely photographed and logged them first, as municipal trash pickup may remove them before an inspection occurs.
💵 How do I prove the value of something I already threw away?
If the item is gone, you prove value by combining the detailed photos you took prior to disposal (showing the brand and condition) with original receipts, digital manuals, or online purchase history that matches the photographed item.
📹 Is a video better than photos for items I am discarding?
A video is an excellent supplement to show the scope of the ruined pile, but it does not replace photos. Video frames are often blurry when paused. Always take crisp, still photographs of model numbers and brand tags in addition to any video walkthroughs.
⚠️ Should I keep hazardous materials if the adjuster asks me to?
Your safety always comes first. If an item poses a severe biohazard or immediate structural risk, document it thoroughly from a safe distance, log it, and remove the hazard. Communicate the safety reasons clearly in writing.
⚠️ Disclaimer: PropertyClaimChecklist.com provides practical guidance, process checklists, and example follow-ups to help you organize a property claim and move it forward. It is not policy language, claim documentation, legal content, or a substitute for your insurer's instructions. Always rely on your carrier's requirements and your actual policy terms for what must be submitted and how decisions are made.