- Evidence mapping is the process of linking a specific item on your inventory to its corresponding photo and its receipt using a unique ID.
- Without a mapping system, reviewers are left guessing which photo belongs to which receipt, often leading to delays and requests for clarification.
- Keep it simple: assign a short alphanumeric tag (like LR-01) to an item, and use that exact tag in your spreadsheet, your photo file name, and your receipt file name.
- Never leave evidence “floating.” Every document you submit should clearly point to a specific line item on your claim.
The Danger of “Floating” Evidence
In my years of reviewing and organizing claim files, I have seen a very common pattern that causes immediate delays. A homeowner will submit a folder containing 400 photos of damage, followed by a separate folder containing 50 PDF receipts, and finally, a spreadsheet listing 200 items. On the surface, it looks like they have done everything right. They have gathered their proof. But when you sit down to actually review the file, a major problem emerges.
Nothing connects.
I call this “floating evidence.” The reviewer is forced to play a massive game of memory, trying to match a photo of a burnt television to a Best Buy receipt from three years ago, and then trying to find that specific television on line 42 of a spreadsheet. In many cases, the reviewer simply does not have the time to solve this puzzle. They will pause the file and send an email asking for clarification. You lose weeks of progress simply because the dots were not connected.
This is where evidence mapping photos inventory receipts becomes the most valuable habit you can build. While preferred submission formats vary by carrier, the core logic of mapping stays the same. It is a manual framework that ties your proof together so tightly that no one has to guess what they are looking at. When you map your evidence correctly, you take control of the narrative and make it much easier for the other side to say “yes, this matches.”
Building Your ID Tagging System
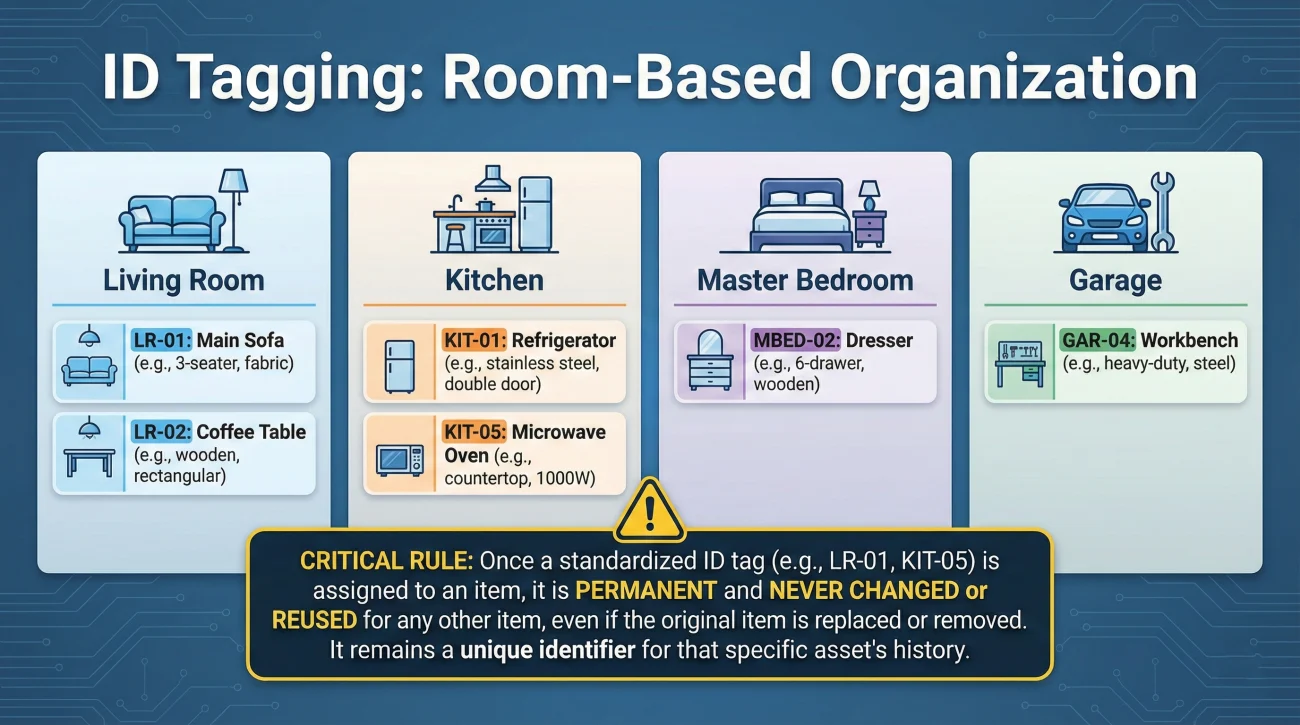
The entire framework of evidence mapping rests on one very simple concept: the ID Tag. An ID tag is a short, unique code that you assign to every single item or group of items you are claiming. This tag becomes the bridge between your spreadsheet, your pictures, and your financial records.
I always recommend keeping these tags as simple as possible. Do not try to create a complex barcode system. Use a combination of the room name (or location) and a sequential number. To keep things consistent, create a quick ID dictionary for yourself. Standardize your prefixes early on so you do not get confused later: LR (Living Room), KIT (Kitchen), MBED (Master Bedroom), GAR (Garage), OFFICE (Office), or BATH (Bathroom).
Simple ID Tag Examples:
    LR-01 (Living Room, Item 1)
    KIT-15 (Kitchen, Item 15)
    GAR-04 (Garage, Item 4)
    MBED-02 (Master Bedroom, Item 2)
Once you assign an ID to an item, that ID is locked in. It never changes. It becomes the official name of that item for the rest of the process. If you are dealing with a destroyed leather sofa in your living room, it is no longer just “the sofa.” It is now “Item LR-01.”
By establishing this baseline, you are preparing to route all your future documentation through a central hub. If you are just starting to organize your digital files to hold these items, I highly recommend looking at our complete framework in the property claim evidence pack guide to ensure your main folders are set up correctly before you start tagging.
The Three-Point Connection Framework
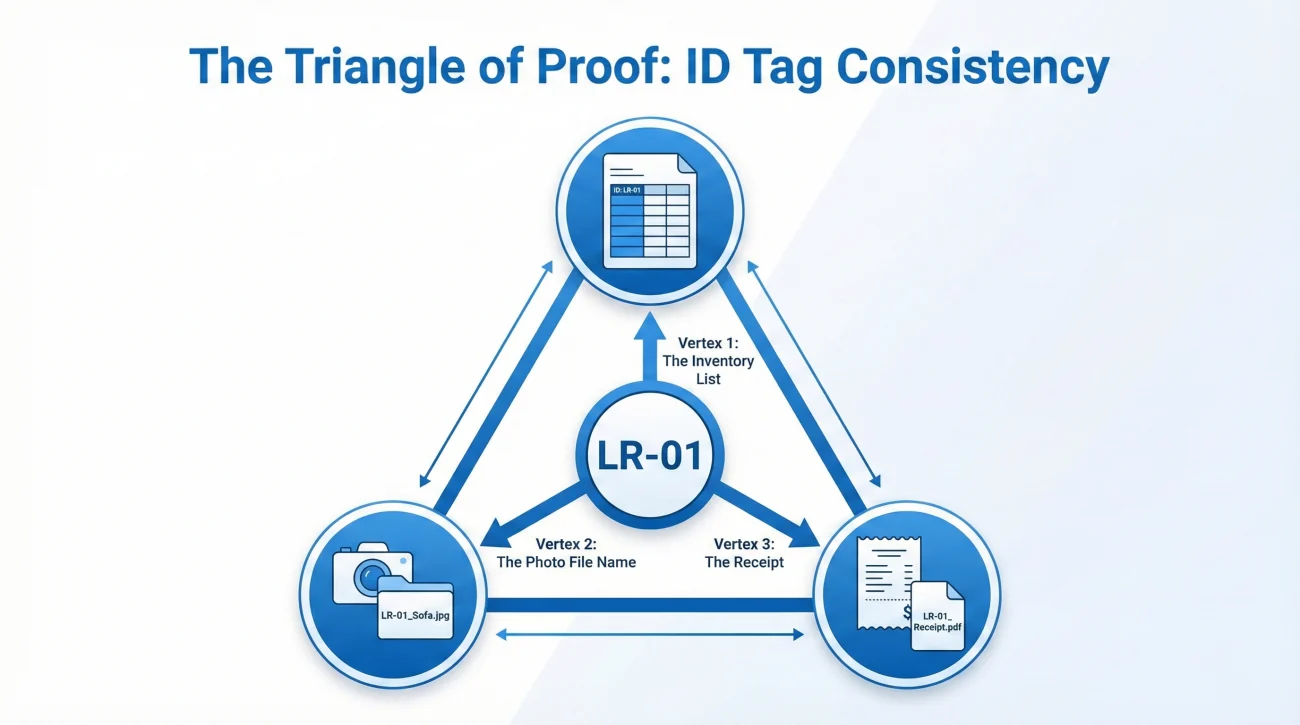
To map your evidence properly, you must establish a three-point connection for every major item. This means the ID tag must appear in three distinct places simultaneously. If one point is missing, the triangle breaks, and you are left with unindexed proof.
Point 1: The Inventory List
Your spreadsheet (or written list) is the master map. The very first column on your list should be labeled “Item ID.” When you log the leather sofa, you write LR-01 in that first column. The spreadsheet is where the ID is born.
Point 2: The Photo File Name
When you take a picture of the damaged sofa, your phone or camera will name the file something like “IMG_9845.jpg”. A reviewer does not know what IMG_9845 is. You must rename that digital file to include the ID tag. For example, you would rename it to “LR-01_Damaged_Sofa.jpg”.
Point 3: The Receipt or Proof of Purchase
If you have a PDF receipt or a scanned physical receipt for that sofa, the file name must also include the ID tag. You would name the file “LR-01_Receipt_Macys.pdf”. If you are dealing with physical papers, you literally write “LR-01” in the top right corner of the paper with a pen before you scan it.
Row 12: Leather Sofa
Photo attached: image004.jpg
Receipt attached: scan_nov_12.pdf
Row 12: [LR-01] Leather Sofa
Photo attached: LR-01_Damage.jpg
Receipt attached: LR-01_Receipt.pdf
Field Note: The “Mystery Receipt” Scenario
Let me share a scenario that happens constantly in day-to-day claims operations. A homeowner submits a credit card statement showing a $1,200 charge at a big-box electronics store. The line item just says “Store #442 – Electronics.”
In the homeowner’s mind, they know exactly what this is. They bought a specific high-end laptop that was later destroyed by water damage. But look at it from the reviewer’s perspective. They are looking at a $1,200 generic charge. Did you buy a laptop? Did you buy three televisions? Did you buy a refrigerator? There is no way to know, and the reviewer cannot simply assume.
Key Point: Evidence does not speak for itself. You must provide the translation. A receipt only has value if it is explicitly tied to a specific loss.
If the homeowner had used an evidence mapping strategy, they would have a row on their inventory labeled “OFFICE-05: Laptop.” They would have a photo named “OFFICE-05_WaterDamage.jpg”. And they would have saved that credit card statement as “OFFICE-05_CreditCardProof.pdf”. By doing this, they instantly remove the mystery. They answer the reviewer’s question before it is even asked.
Setting Up Your Mapping Fields
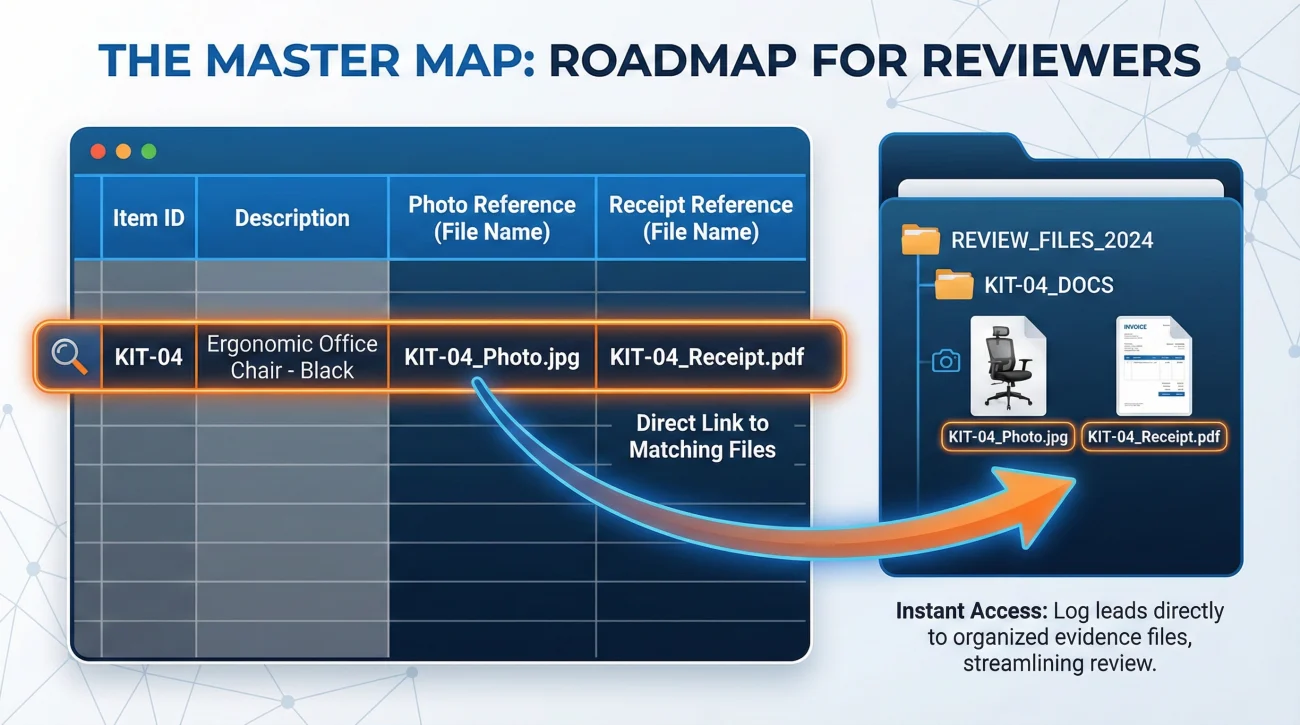
You do not need specialized software to track this. A simple spreadsheet is usually the best tool because it is universally readable. When setting up your master inventory list, you need specific columns dedicated to mapping.
Here is the basic structure I recommend for a highly functional mapping log. Notice how every piece of external evidence is explicitly referenced in the row.
| Item ID | Description | Photo Reference (File Name) | Receipt Reference (File Name) |
|---|---|---|---|
| LR-01 | Sectional Sofa (Brown) | LR-01_Damage.jpg | LR-01_Receipt_Wayfair.pdf |
| KIT-04 | Coffee Maker | KIT-04_Damage.jpg | KIT-04_BankStatement.pdf |
| BED-12 | Mattress (Queen) | BED-12_WaterLine.jpg | BED-12_EmailReceipt.pdf |
When you present data in this format, you are providing a roadmap. A reviewer can look at row two, see the coffee maker, and immediately know exactly which two files in your folder they need to open to verify the claim. It reduces friction significantly.
Consistency Rules for Evidence Mapping
A mapping system is only as good as your discipline in maintaining it. Under stress, it is very easy to get sloppy and start taking shortcuts. Based on where I commonly see these systems break down, here are the strict rules you should follow to keep your files clean.
Rule 1: Never reuse an ID tag
If you accidentally list an item twice, or if you decide an item is not actually damaged and you remove it from your claim, do not recycle that ID tag for something else. If you delete item LR-04, then LR-04 is dead. Just move on to LR-05. Reusing tags creates massive confusion if old versions of your files get mixed up.
Rule 2: Map the file name, not just the file type
⚠️ Warning: Do not just write “Yes” or “Attached” in your photo or receipt columns. You must write the actual file name. If you have 500 files, writing “Yes” does not help anyone find the document.
Rule 3: One receipt, multiple items requires clear notes
Often, you will have one long receipt from a hardware store or a clothing retailer that covers ten different items on your inventory. You do not need to scan the receipt ten times. Save the receipt once. For example, if you have a long Home Depot receipt containing drywall screws, a drill, and a shop vacuum, you save the single receipt file as “HomeDepot_Receipt_01.pdf”. On your spreadsheet, next to the ID for the screws, you list that exact file name. Next to the ID for the drill, you list that same file name again. The reviewer will simply open the file once and see all the connected items. To be extra helpful, visually mark the line items in the PDF if your tools allow.
Rule 4: Standardize your date formats
If your mapping system includes dates of purchase or dates of damage, pick one format and stick to it (for example, YYYY-MM-DD). Inconsistent formatting often leads to sorting errors in spreadsheets, which can scramble your mapped data.
Minimum Viable Mapping: Where to Start
When you are staring down a massive loss, the idea of mapping every single item immediately is paralyzing. You do not need to map 200 items on day one. Start with a “minimum viable” approach.
Focus your energy on high-value items, highly disputed items, or structural materials first. Get your most expensive electronics, major furniture, and significant repair receipts securely tagged and logged. Once those core items are mapped and safely organized, you can move on to the lower-value items using broader grouping strategies. Pace yourself so you do not abandon the system entirely.
Handling Bulk Items Without Burning Out
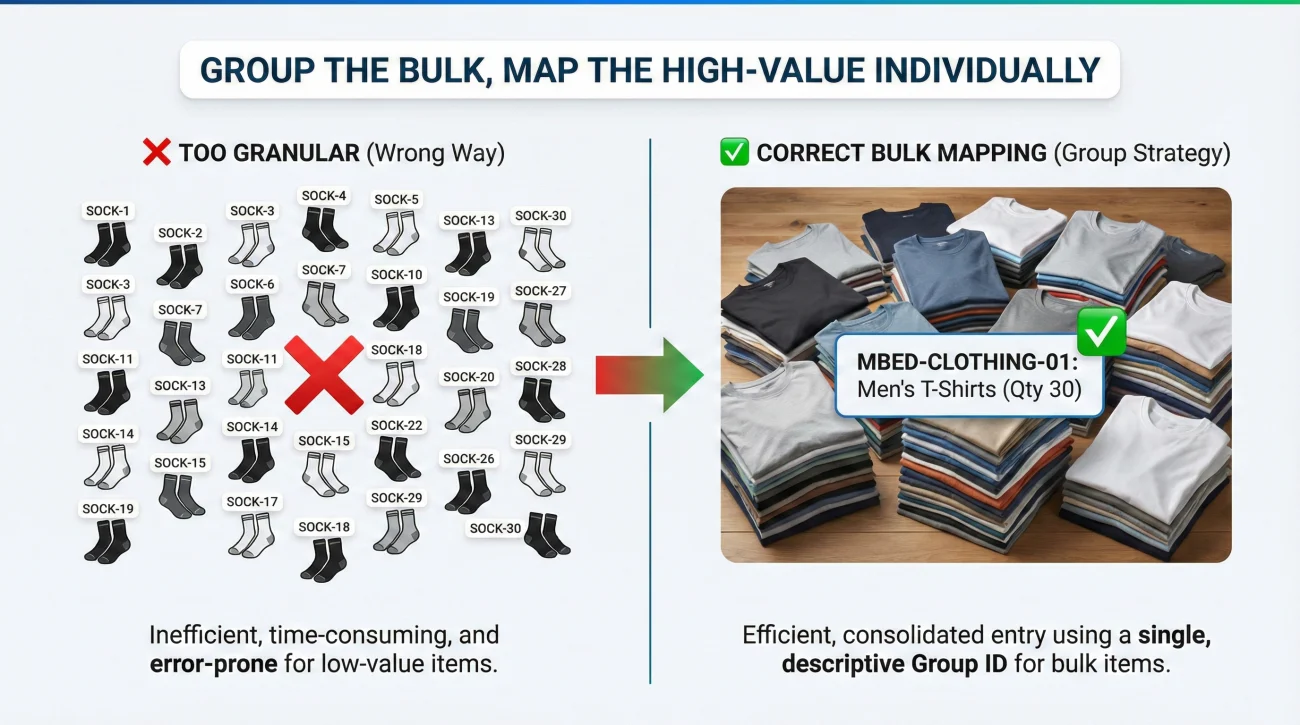
One of the biggest mistakes people make when trying to organize their proof is trying to be too granular with low-value items. I have seen people try to create an ID tag, a photo file, and a spreadsheet row for every individual pair of socks in a ruined dresser. You will burn out in three days if you do this.
For bulk items, you need to map at the group level.
- ✅ Group similar items together logically.
- ✅ Assign one ID tag to the entire group.
- ✅ Take one wide photo showing the volume of the group.
For example, instead of 30 entries for t-shirts, you create one entry: “MBED-CLOTHING-01: Men’s T-Shirts (Qty 30).” You take one photo showing the pile of damaged shirts, and you name that photo “MBED-CLOTHING-01_Damage.jpg”.
💡 Pro Tip: If you have one or two very expensive items mixed in with the bulk (like a designer jacket in a closet of regular clothes), pull the expensive items out. Give them their own unique ID tag and their own mapped photo. Group the low-value items, map the high-value items individually.
Communication: Presenting Your Mapped Evidence
Once you have mapped your files, you need to explain your system when you submit it. Do not just attach a zip file and send a blank email. Take a moment to politely explain how you have organized the data, so the person on the other end knows they have a roadmap.
If you are submitting your mapped evidence in stages, you must use a versioning rule. Never send a file simply named “Inventory.xlsx” twice. When you send Batch 2, your master index should be renamed with the current date, such as “Inventory_Map_2026-02-24.xlsx”. This prevents the reviewer from accidentally working off an outdated version of your proof.
Here is a simple, neutral script you can use to frame your submission:
Subject: Claim Documentation Submission – [Your Claim Number] – Batch 1
Hello [Name],
Please find attached the first batch of documentation regarding the property damage.
To make the review process easier on your end, I have organized the files using an ID system. The attached spreadsheet acts as an index. For every item listed, you will find a corresponding photo and receipt file named with the matching ID tag (for example, Item KIT-01 matches the photo KIT-01_Damage.jpg).
Please review the attached spreadsheet and let me know in writing if you have any questions about specific items, or if you need me to format this data differently for your system.
Thank you for your time,
[Your Name]
This script establishes a professional tone. It shows that you are organized, cooperative, and treating this like a serious business transaction. More importantly, it makes it easier for the reviewer to understand your structure.
Troubleshooting Missing Links in Your Map
In the real world, your map will rarely be perfect on the first day. You will likely encounter situations where one side of the triangle is missing. It is important to handle these gaps correctly so they do not cast doubt on your entire system.
Scenario A: You have the item and the photo, but no receipt.
This is common. Map the photo to the inventory spreadsheet normally using your ID tag. In the column where you would normally list the receipt file name, clearly write “No original receipt available.” Do not leave the cell blank. A blank cell looks like you forgot to attach something. A clear note shows you are being transparent. You can then provide alternative proof (like a credit card statement or an owner’s manual) and map that file instead.
Scenario B: You have a receipt, but the item was thrown away before you took a photo.
This is a tougher situation. Map the receipt to the inventory sheet. In the photo column, write “Item disposed of prior to photo capture.” Again, transparency is key. You will need to rely heavily on the quality of the receipt and your written timeline to support the inclusion of this item.
By addressing these gaps directly inside your mapping spreadsheet, you prevent the reviewer from having to stop their workflow to email you a question. You are answering the unasked questions upfront.
Final
Organizing a large volume of files after property damage can feel overwhelming, but mapping your evidence is one of the best ways to regain a sense of control. When you link your photos, receipts, and inventory items together using a consistent ID system, you stop being a victim of administrative chaos. You build a clean, organized package that is easier to verify.
Take your time setting up your columns and renaming your files. The hours you spend creating a solid map on your end will save you weeks of frustrating back-and-forth emails later. Keep your tags simple, stay consistent with your naming rules, and always ensure every document you submit has a clear, deliberate purpose.
❓ FAQ
🕵️ How do I link a receipt to a specific photo?
You link them by giving both digital files the exact same prefix. Assign an ID (like KITCHEN-04) to the item. Name the photo file “KITCHEN-04_Image” and name the receipt file “KITCHEN-04_Receipt.” List that exact ID in your main spreadsheet.
📁 Do I need special software for evidence mapping?
No. A basic spreadsheet program (like Excel or Google Sheets) and your computer’s built-in file folders are all you need. Complex software often makes it harder to share files smoothly.
🤷♀️ What if I have a photo of the item but no receipt?
Map the photo to the item ID as usual. In your spreadsheet’s receipt column, write a clear note stating “No original receipt available.” You can map alternative proof, such as an owner’s manual or warranty card, using the same ID.
📦 How do I map a pile of clothes that were destroyed?
Group them logically. Assign one ID to the entire group (e.g., CLOSET-SHOES). Take wide photos of the group, name the photo with that ID, and log it as a single bulk entry on your spreadsheet indicating the approximate quantity.
📝 Should I write the ID tag physically on the receipt?
Yes, if you have paper receipts, writing the ID code in the top margin before scanning it is an excellent habit. It permanently ties the physical paper to your digital spreadsheet system.
🏷️ What is the easiest way to label my photo files to match the inventory?
Move the photos from your phone to a computer first. Right-click the file, select “Rename,” and type the ID tag from your spreadsheet followed by a brief description (e.g., GARAGE-01_Toolbox.jpg).
🔄 What happens if I find another receipt after I already mapped my items?
Scan the new receipt, add the existing ID tag for that item to the file name (e.g., LR-05_Receipt_Additional.pdf), and update your master spreadsheet to include the new file reference. Submit the updated log clearly marked with a new date.
📱 Can I just put all my photos in a single folder and share a link?
This depends heavily on the carrier’s intake workflow, but in many cases, no. Sending hundreds of unmapped photos usually results in the reviewer asking you to identify them. Map the files and reference them in a spreadsheet first, then share the organized folder.
🧾 What if one receipt has multiple items on it?
Save the receipt as a single PDF. On your spreadsheet, list that exact same PDF file name next to every item ID that appears on that receipt. You do not need to cut or copy the receipt multiple times.
⏳ How much detail does the adjuster actually need in my mapping list?
They need enough detail to find the matching proof without guessing. Provide the unique ID, a clear item description, the exact photo file name, and the exact receipt file name. Keep it clean and highly structured.
⚠️ Disclaimer: PropertyClaimChecklist.com provides practical guidance, process checklists, and example follow-ups to help you organize a property claim and move it forward. It is not policy language, claim documentation, legal content, or a substitute for your insurer's instructions. Always rely on your carrier's requirements and your actual policy terms for what must be submitted and how decisions are made.