- Estimates are often organized in ways that make it difficult to spot missing items, grouping disparate repairs into confusing categories.
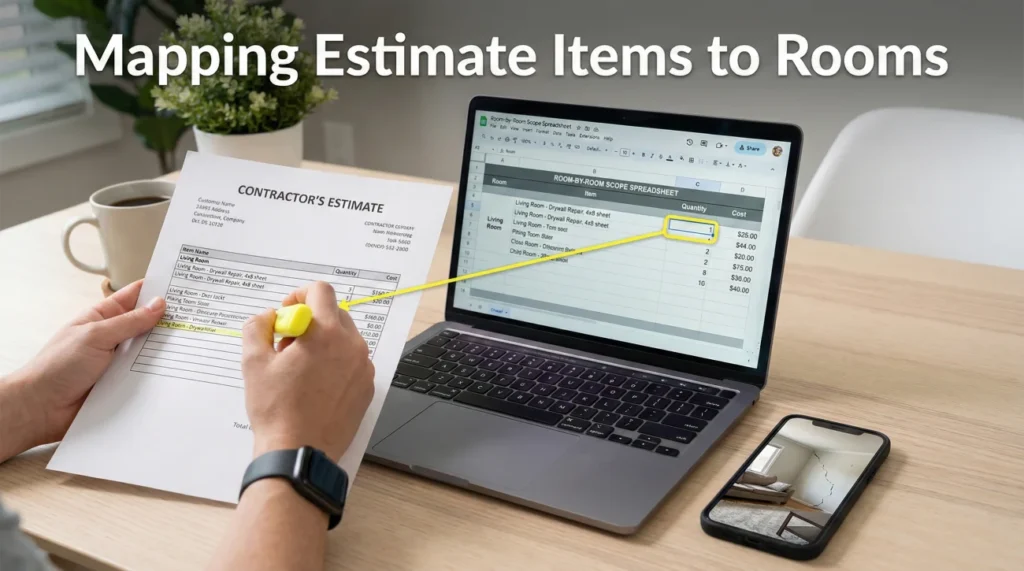
- A room-by-room map translates the insurer’s line items into a physical checklist, making missing scope visually obvious.
- By explicitly linking missing line items to existing photo IDs, you remove the guesswork for the desk adjuster reviewing your file.
- Never argue about price until you have fully mapped the physical scope; correcting the room measurements often fixes the financial gap automatically.
The Overwhelm of a 30-Page Estimate
Receiving your first property damage estimate is a daunting experience. You open a thick PDF, expecting a clear, logical breakdown of the repairs needed for your home. Instead, you are met with pages of cryptic codes, strange abbreviations, and grouped line items that seem to jump randomly from the roof to the living room, and back out to the garage.
In my experience overseeing claims operations, this is where many files start to drift for most homeowners. When the document is hard to read, it is incredibly easy to assume that everything is covered, or conversely, to panic because the total dollar amount looks far too low. I often see people react by immediately disputing the bottom-line payout. But arguing about the final number is a tactical error.
The core issue is often not the individual price of a piece of drywall or a linear foot of baseboard. The issue is usually “scope.” Scope simply means the physical list of what needs to be repaired or replaced. Estimating software tends to lump items together, which causes field adjusters to accidentally omit continuous flooring, ceiling transitions, or trim work. To get paid accurately, you need a system to translate their confusing document into your physical reality. You need to map the estimate line items to specific rooms.
Why Estimating Software Hides the Gaps
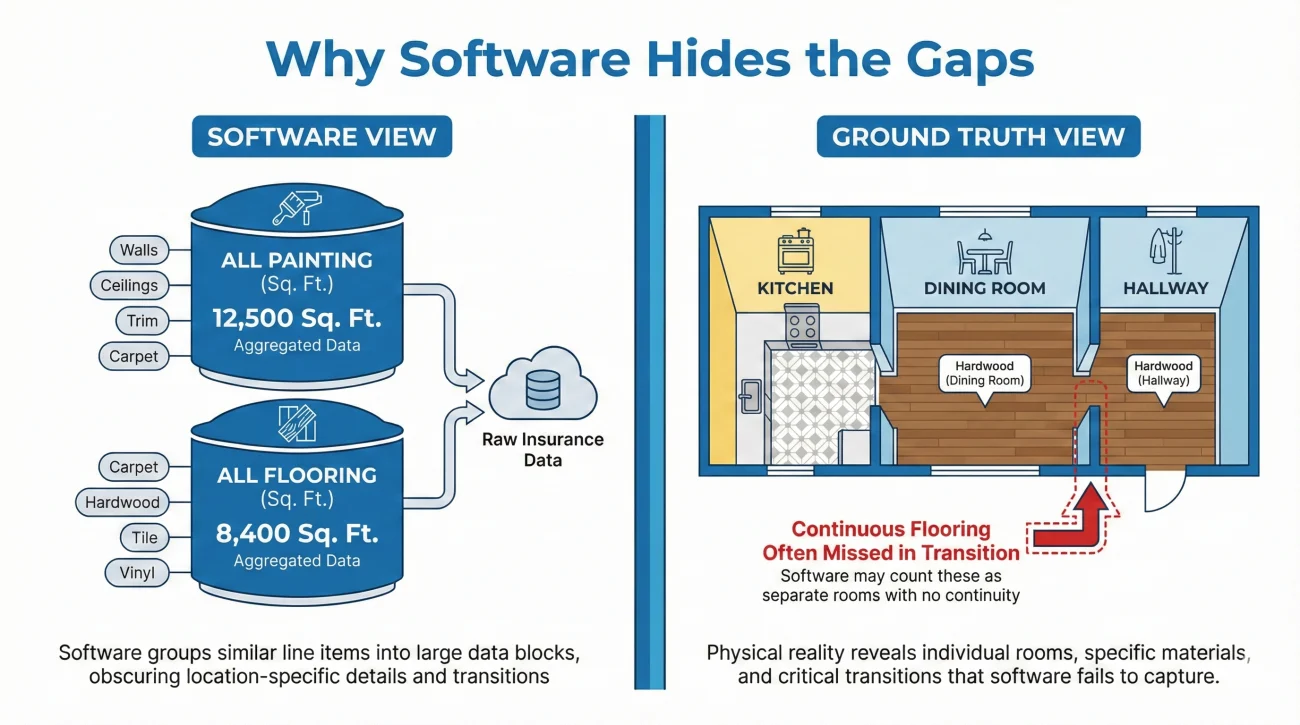
To fix an incomplete estimate, it helps to understand how it was built. When a field adjuster walks through your property, they are taking measurements and entering data into specialized estimating software. This software is designed for speed and standardization, not necessarily for homeowner readability.
Depending on how the adjuster sets up the file, the software might group all the painting into one section, all the flooring into another, and all the drywall into a third. If you have a damaged kitchen that flows openly into a dining room, the software might only list “drywall repair” under a generalized “Main Level” heading. When you look at the estimate, you see drywall is paid for, so you assume you are covered. But without mapping that line item to a specific room, you cannot confirm if they paid for the kitchen walls, the dining room walls, or both.
💡 Pro Tip: Desk adjusters reviewing your file later on did not see your house. They only see the software output. If a room is not explicitly named and linked to a missing item, they will assume it does not need repairs.
This structural confusion is why you must take control of the data. By taking their line items and forcing them into a scope grid, the gaps become glaringly obvious. If the kitchen floor is listed but the identical continuous dining room floor is missing, the map will highlight that discrepancy immediately.
The Room-Scope Mapping Framework
Mapping your estimate is an operational exercise. It requires patience, a highlighter, and a structured approach. You are essentially building a translation key that makes the review easier to approve. Here is the reliable routine I recommend for breaking down a complex estimate.
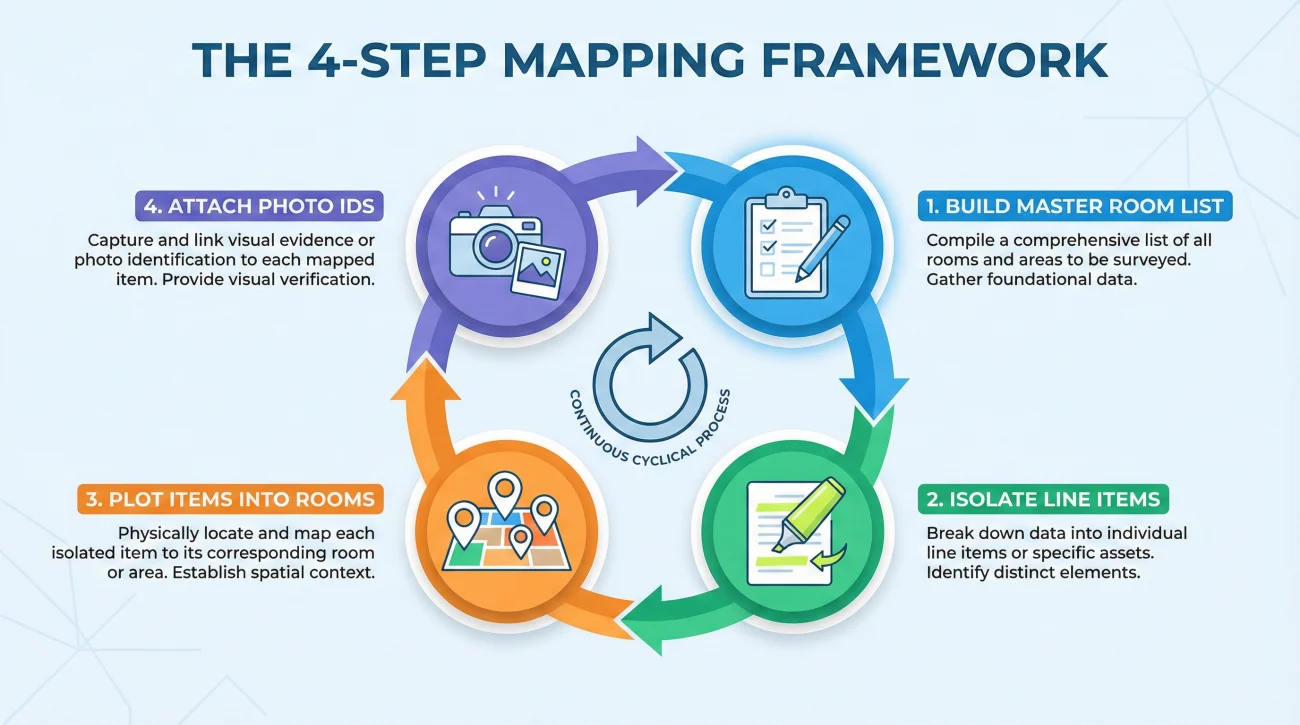
Step 1: Build the Master Room List
Do not start by reading the estimate. Start by walking through your home with a notepad. Write down every single room or distinct area that sustained damage. If an open-concept living area flows into a kitchen, list them as two separate areas. Include closets, hallways, and stairwells, as these are the areas most commonly missed by field adjusters.
To prevent confusion, establish a room naming rule immediately. Use a format like Floor + Room + Sub-area (for example, “Main Level – Hallway – Closet”). You must use this exact name consistently across your map, your emails, and your photo folders so the desk adjuster can easily match them.
Step 2: Isolate the Estimate’s Line Items
Now, open the estimate. Go through line by line and identify what specific physical action is being paid for. Highlight the action (e.g., “remove and replace 1/2 inch drywall”) and the quantity. Ignore the dollar amounts completely for now. Your goal is only to understand what material is being addressed. You will come back to price later, after the physical scope is complete.
Step 3: Plot the Items into the Rooms
Take your Master Room List and begin assigning the highlighted line items to their respective rooms. If the estimate says “Master Bedroom: Replace Carpet,” check that off on your master list under the Master Bedroom section. As you do this, you will quickly notice items that exist in reality but have no corresponding line item on the estimate.
Step 4: Attach the Existing Photo IDs
This is one of the highest-leverage steps for getting missing items approved. Once you find a gap (for example, the Master Closet carpet is ruined, but not listed), you must link it to proof. You should already have a folder of damage photos. Find the specific photo showing the ruined closet carpet, note its file name (like IMG_1042.jpg), and tie that ID directly to the missing scope item on your map.
What to Do When You Have Proof but No Photo Yet
If you know an item was damaged but realize you lack a specific picture, do not submit the gap list with a blank photo ID. Go back to the area and take a series of “wide, close, and reference” photos. Name the new file clearly according to your naming rule, and update your room checklist before you hit send.
Field Note: The Open-Concept Oversight
I see this specific pattern constantly when reviewing supplemental requests. A homeowner had a massive water leak in their kitchen. The water ran across the continuous hardwood floors, completely ruining the kitchen, the attached breakfast nook, and the long hallway leading to the front door.
The insurance estimate came back, and the homeowner was furious about the low payout. They called the hotline to complain about the “cheap pricing.” But when we broke the estimate down operationally, the pricing per square foot was actually quite standard. The problem was the scope.
The field adjuster had grouped the “kitchen” and “nook” under one room label in the software and had completely forgotten to add the hallway to the floorplan. By building a Room-Scope Map, the homeowner stopped arguing about the dollar amount per plank of wood. Instead, they submitted a clean map showing that while the kitchen was scoped, the 150 square feet of continuous hallway was missing, referencing “Photo ID: Hallway_Damage_01.jpg.” The desk adjuster saw the proof, and the payout was corrected quickly once the missing room was added to the software.
Structuring Your Scope Map
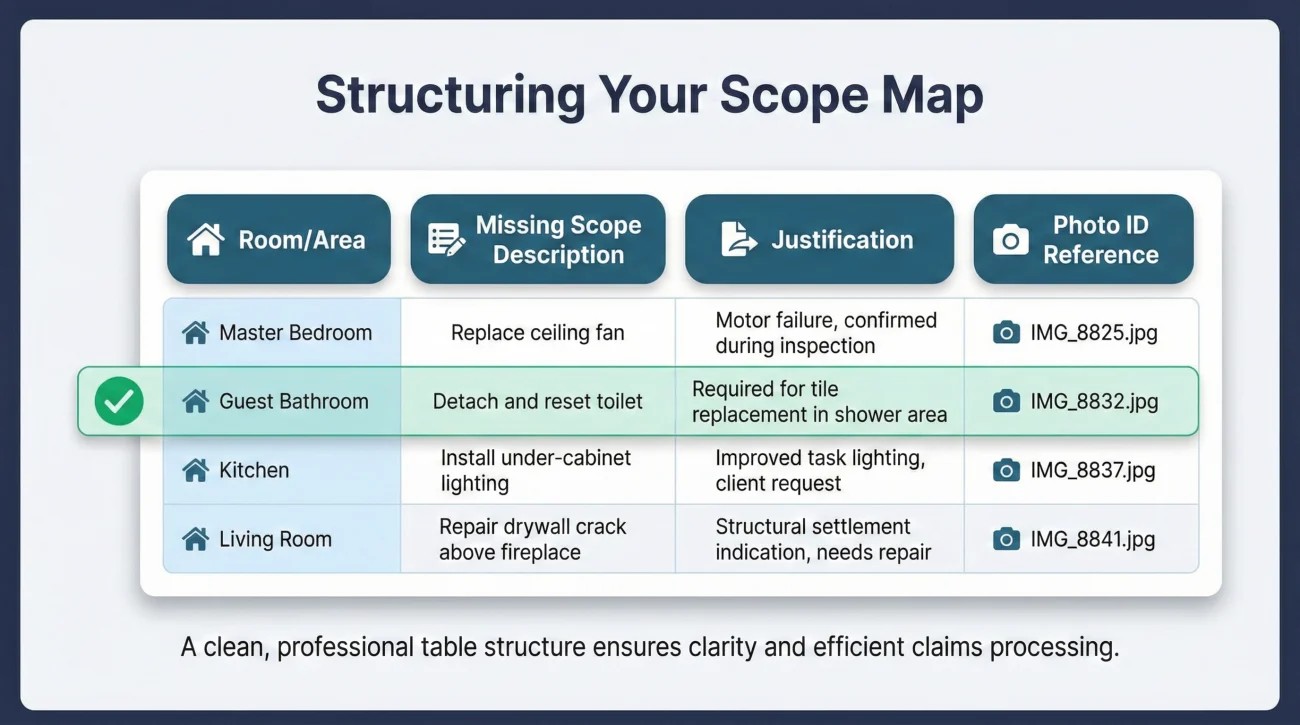
When you prepare to send your findings back to the adjuster, you need to format it in a way that aligns with their workflow. Adjusters love spreadsheets and clean tables. They do not like reading long, emotional paragraphs about how unfair the estimate is. Presenting your gaps in a structured grid makes it easy for them to input the missing data into their system.
Here is the standard layout you should use to present a missing scope item. You can build this in a simple spreadsheet or a document table.
| Room / Area | Missing Scope Description | Justification | Photo ID Reference |
|---|---|---|---|
| Guest Bathroom | Detach and reset toilet | Required to replace continuous floor tile. | IMG_8832.jpg |
| Living Room | Baseboard replacement (45 linear ft) | Water wicked into baseboards, requiring removal for drywall repair. | IMG_8840.jpg, IMG_8841.jpg |
| Hallway Closet | Drywall repair (bottom 2 feet) | Omitted from main hallway measurements; sustained direct water contact. | IMG_8845.jpg |
Key Point: By providing the exact Room, the physical Action, the operational Reason, and the Photo ID, you give the desk adjuster everything they need to justify approving the addition to their manager.
Presenting the Map to Your Adjuster
Once your map is complete and you have identified the missing line items, you need to submit it cleanly. Do not frame this as a demand letter or a hostile dispute. Frame it as a collaborative correction of an administrative oversight.
Using a polite, process-driven tone is often one of the most reliable ways to get a file reviewed quickly. You want to submit your mapped room checklist along with the referenced photos in a single, well-organized email.
[Acknowledge the estimate] + [Identify the missing rooms/items] + [Provide the mapped checklist and photo IDs] + [Request the specific next step]
The Scope Correction Request Script
Use this template when emailing your adjuster. It keeps the focus entirely on the physical gaps rather than the money.
Hello [Adjuster Name],
Thank you for providing the initial estimate. After walking through the property and cross-referencing the line items with the damaged rooms, I noticed a few physical areas and repair steps that seem to have been accidentally omitted from the scope of work.
To make this easy to review, I have created a mapped list below (and attached as a PDF) detailing the specific rooms, the missing repair items, and the corresponding photo IDs that show the damage.
[Insert Your Room-Scope Table Here or reference the attachment]
I have attached the referenced photos to this email. Could you please review these missed items, confirm receipt of this list, and let me know if you need any additional documentation to revise the estimate?
Best regards,
[Your Name]
Common Mistakes When Mapping Scope
Homeowners often dilute the effectiveness of their scope requests by mixing operational facts with emotional arguments. To keep your claim moving efficiently, avoid these common mapping errors.
- ❌ Mixing price with scope: Never say “The line item for drywall is $100 too low.” That is a pricing argument. Always say “The line item for drywall is missing 40 square feet for the closet.” Fix the measurement, and the pricing often fixes itself.
- ❌ Failing to use Photo IDs: If you say “the baseboards are ruined” but do not reference a specific photo file name, the adjuster has to dig through hundreds of pictures to verify your claim. They likely will not do it. Always tie the gap to a specific piece of visual proof.
- ❌ Ignoring “Detach and Reset” items: People often map the big items (floors, walls) but forget the operational steps. If a floor is replaced, the toilet, baseboards, and appliances must be detached and reset. Map these actions to the room as well.
- ❌ Creating a confusing format: Do not send a heavily formatted, color-coded spreadsheet with complex formulas. Keep it to a simple grid: Room, Item, Reason, Photo ID.
⚠️ Warning: If you submit a massive list of missing items without referencing any existing photos or documentation, the desk adjuster will likely reject the request and require a full reinspection, which can delay your claim by weeks.
A 5-Minute Scope Mapping Audit
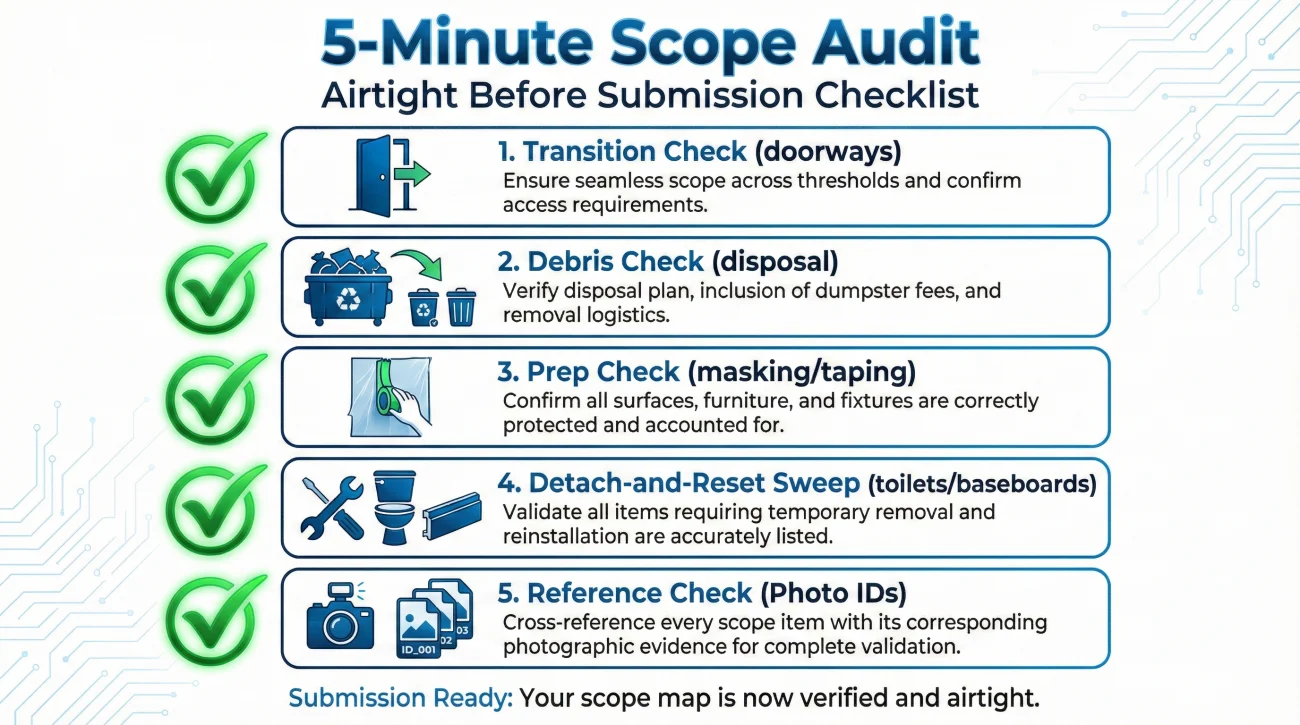
Before you finalize your map and send it to the adjuster, run it through this quick operational audit to ensure it is airtight.
- 🔍 The Transition Check: Did you map the areas where two rooms meet? (e.g., doorways, thresholds, continuous ceilings).
- 🔍 The Debris Check: Is there a line item for the removal and disposal of the damaged materials in that specific room?
- 🔍 The Prep Check: Did you include the masking, taping, or surface preparation needed before the repair can happen?
- 🔍 The Detach-and-Reset Sweep: Did you account for the items that must be moved to perform the primary repair? (e.g., toilets, vanities, baseboards, doors/trim, appliances, and closet shelving).
- 🔍 The Reference Check: Does every single missing item you listed have a corresponding, clearly named photo ID attached?
If you are struggling to figure out how to compile all of this information into a cohesive package that adjusters respect, I highly recommend reviewing the broader process of building a response to a low estimate. Organizing your documentation is half the battle.
Final Thoughts on Controlling the Scope
When you receive an estimate that feels inadequate, your best defense is organization. The insurance company relies on complex software to group and summarize damage, which inevitably leads to gaps, missed rooms, and overlooked transition areas. You cannot control their software, but you can control how the data is presented back to them.
By implementing a Room-Scope Map, you force the conversation out of the subjective realm of “fair pricing” and into the objective reality of physical measurements and missed line items. Translating their confusing document into a room-by-room checklist, backed by concrete photo IDs, removes the ambiguity from the review process. It provides the desk adjuster with a clear, justifiable roadmap to revise the estimate and ensures your property is fully accounted for.
❓ FAQ
🗺️ Why doesn’t the insurance estimate just list everything by room automatically?
Estimating software often groups similar trades together (like putting all painting in one section) to make bulk pricing easier for the insurer. Unfortunately, this makes it very hard for a homeowner to verify if a specific room was included.
📸 What is a photo ID and why do I need it for the scope map?
A photo ID is simply the file name of your digital picture (e.g., IMG_405.jpg). Referencing this exact ID on your scope map tells the adjuster exactly which piece of evidence proves your missing item, saving them from guessing.
🚪 How do I handle continuous flooring that spans multiple rooms?
On your map, list each distinct room separately but note that the flooring is continuous. If the estimate only paid for the kitchen, you would list the connected dining room as missing scope, noting that the floor cannot be patched seamlessly.
📝 What if I don’t know the exact construction term for a missing item?
Use plain, descriptive language. You do not need to know the software code. Writing “remove the bathroom mirror to paint behind it” is perfectly fine; the adjuster will know how to translate that into their system.
📏 Should I include my own measurements on the scope map?
Yes, if you have them. If you know a missing closet is 4×5 feet, adding “20 square feet” to your missing scope description helps the adjuster input the correction faster.
🛠️ Do I map the damage, or the repair process?
You map the repair process. Do not just list “wet wall.” List the actions required: “remove wet drywall, replace insulation, install new drywall, paint.” This ensures all operational steps are captured.
🗂️ Can I use the contractor’s estimate to build my scope map?
Yes. A detailed contractor’s bid is an excellent tool to cross-reference against the insurance estimate. If your contractor listed “hallway baseboards” and the insurer did not, add it to your map.
🗣️ Will mapping the scope speed up my supplement review?
In many cases, yes. Desk adjusters have heavy workloads. If you hand them a clean grid showing exactly what was missed and providing the photo proof, it is much faster for them to process than reading a long, unstructured email.
❌ What if the adjuster rejects my mapped items?
If they reject an item clearly mapped to a photo, reply by asking for their operational reason in writing. Ask them to explain specifically why the documented damage is excluded from the scope.
🔍 Should I map items that are undamaged but need to be moved?
Absolutely. These are called “detach and reset” items. If a perfectly good appliance must be moved to replace the floor beneath it, the labor to move it must be mapped and included in the estimate.
⚠️ Disclaimer: PropertyClaimChecklist.com provides practical guidance, process checklists, and example follow-ups to help you organize a property claim and move it forward. It is not policy language, claim documentation, legal content, or a substitute for your insurer's instructions. Always rely on your carrier's requirements and your actual policy terms for what must be submitted and how decisions are made.