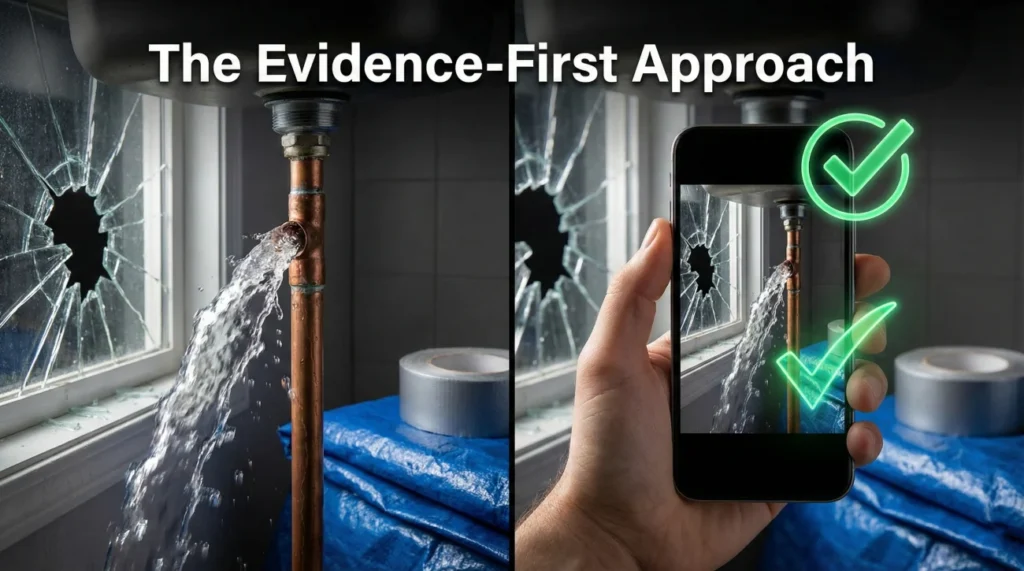
- Document the damage completely before placing any tarp, board, or temporary patch.
- Keep the broken parts (like burst valves or shattered pipes) in a safe place instead of throwing them away.
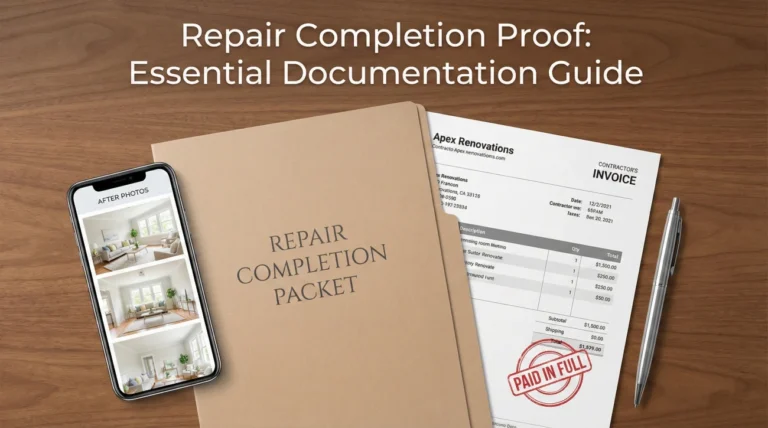
- Log every expense and keep itemized receipts for materials used during emergency mitigation.
- Communicate your temporary repairs to the reviewer in writing, clearly stating that the fix is not permanent.
- Organize these records alongside your main evidence files so the timeline of damage is obvious.
The Urgency Versus Evidence Dilemma
When water is pouring through your ceiling or the wind is howling through a broken window, your only instinct is to stop the chaos. You want to throw a tarp over the roof, board up the glass, or shut off the water and rip out the soaking drywall. This is a completely normal reaction. In fact, most property policies expect you to take reasonable steps to prevent further damage. However, in my time working with claims operations, I have seen this exact moment become a common stumbling block for property owners.
The problem arises because the very act of stopping the damage often destroys the evidence of what caused it. Once a contractor boards up a window, the reviewer looking at the file later cannot see the shattered frame. Once a plumber cuts away a broken pipe joint and tosses it in the trash, the physical proof of the failure is gone. Without temporary repairs documentation for insurance claim files, the person sitting at a desk reviewing your file has to guess about the origin and extent of the initial loss. Reviewers do not like guessing, and when they have to guess, timelines inevitably slip.
My goal with this guide is to help you build a bridge between the emergency of the moment and the strict requirements of a review process. I want to show you how to pause for just five minutes before you or your contractor start swinging hammers or laying tarps. Those five minutes of capturing the right photos and securing the right items can often save you weeks of frustrating back-and-forth emails later.
Key Point: Making a temporary repair is usually necessary to protect your property, but altering the scene without taking comprehensive photos first can accidentally erase the proof you need to validate your loss.
The 5-Minute Priority Map
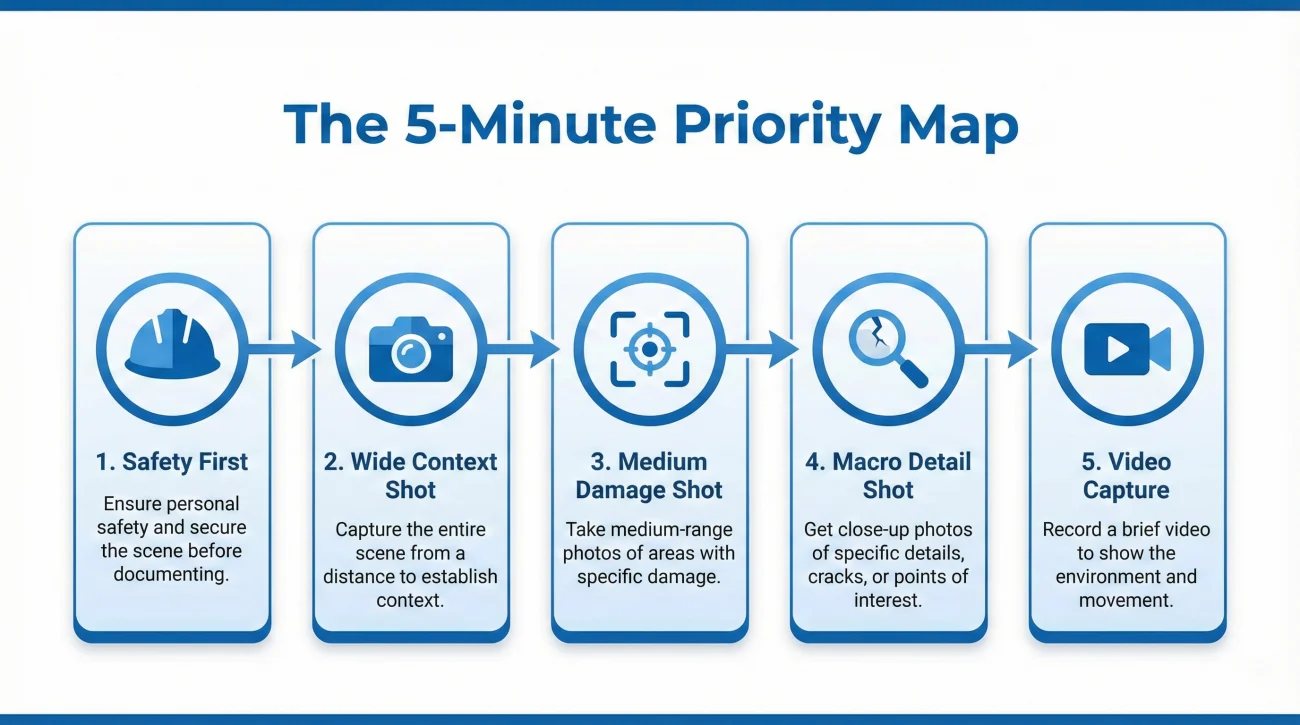
If you are standing in a flooded room or looking at a broken window right now, follow this exact sequence before anyone touches the damage:
- 🛑 Safety first: Ensure the area is safe and power is managed.
- 📸 Wide shot: Capture the whole room context.
- 📸 Medium shot: Capture the damaged section.
- 🔍 Macro shot: Get close to the exact point of failure.
- 🎥 10 second video: Record if water is actively flowing.
- 🧱 Material shot: Photograph the tarp or parts before they go up.
- ✅ Clear the way: Now, let the mitigation team do their job.
Phase 1: The “Before You Touch Anything” Evidence List
The most crucial window for documentation is the brief period right after the damage occurs and right before the emergency mitigation begins. I always tell people that you are essentially acting as a crime scene investigator for your own property. You need to freeze the scene in time.
The Wide to Close Photography Method
When you are in a rush, it is common to just snap one quick blurry photo of a puddle and immediately start mopping. But a single photo of water on a floor tells the reviewer very little. You need a narrative. I recommend a specific capture sequence that tells the full story of the damage.
- 📸 The Context Shot: Stand at the doorway of the room. Take a photo of the entire space. This shows the scale of the room and where the damage is located relative to the rest of the house.
- 📸 The Medium Shot: Step closer to the specific area of damage. If the ceiling collapsed, capture the hole along with the debris on the floor below it. This connects the source to the impact.
- 📸 The Macro Detail Shot: Get very close to the actual point of failure. This might be the split in a washing machine hose, the specific missing shingles on the roof, or the exact point of impact on a fence.
💡 Pro Tip: If the damage is actively happening, such as water actively dripping from a light fixture, take a short 10 to 15 second video. Video captures the severity and flow rate in a way that still photos simply cannot.
A Realistic Field Scenario
Let me share a common pattern I see frequently. Imagine a severe storm blows a heavy tree branch through a living room window. Rain is coming in rapidly. The homeowner immediately calls a local handyman who arrives with plywood and screws to board it up.
If the homeowner lets the handyman work right away, the only photos they will have later are pictures of plywood from the outside and a dark room from the inside. The reviewer will not be able to verify the condition of the window frame, the type of glass that was broken, or the immediate water pooling on the hardwood floor.
In a properly documented scenario, the homeowner says “Stop, give me two minutes.” They execute the priority map. They take a wide shot of the living room showing the rain coming in. They take a medium shot of the shattered glass on the floor. They take a close up of the broken window sash. They take a video of the water running down the drywall. Only then do they tell the handyman to proceed with the board up. That short delay creates a strong foundation for their file.
Phase 2: Preserving the Physical Evidence
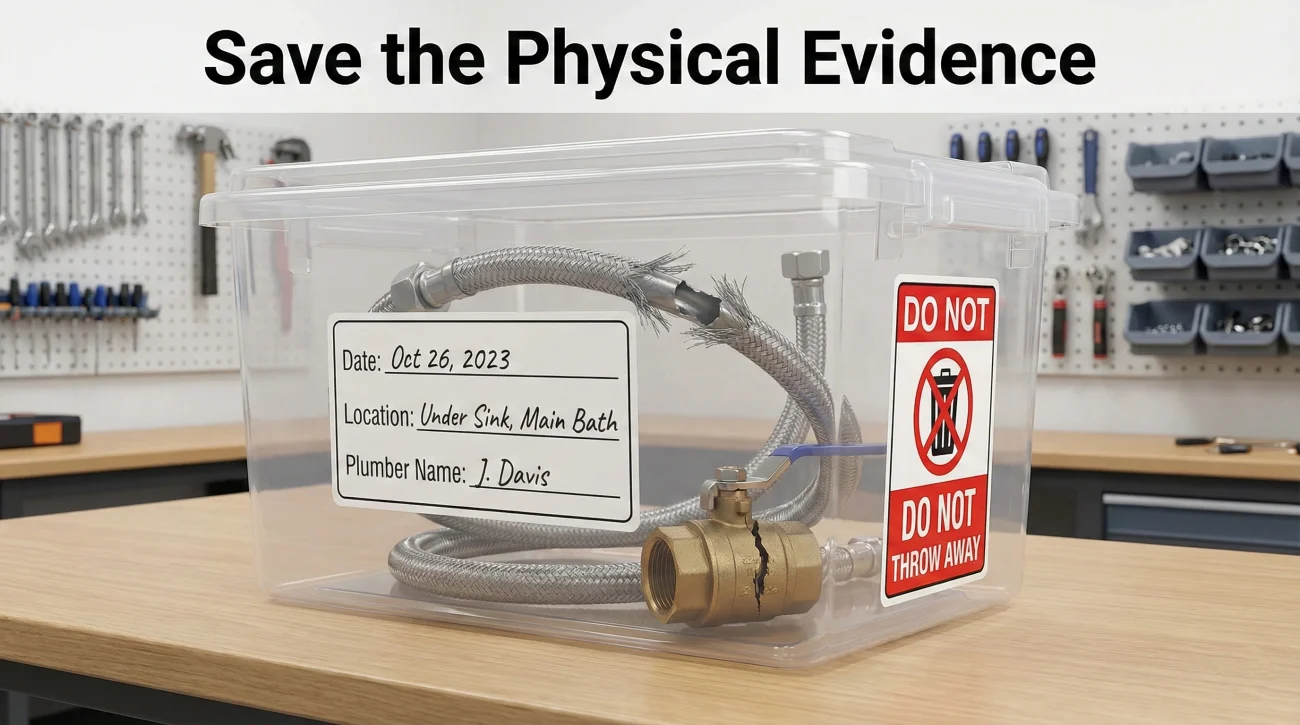
Photos and videos are vital, but sometimes the physical item that failed is the most important piece of evidence in the entire process. In the operations side of claims, we often see a specific issue arise when a temporary fix requires replacing a small mechanical part.
When an emergency plumber comes to fix a burst braided supply line under a kitchen sink, their job is to stop the leak. Their standard cleanup process involves throwing the broken hose into their work bucket and taking it away to the dump. You must intervene.
“Please leave the broken valve and the damaged section of pipe here. I need to keep them for my records.”
Why does this matter? I have seen claim files sit in limbo for weeks simply because an emergency plumber tossed a cracked supply valve into the trash. The reviewer needed to confirm the exact nature of the sudden failure, and without the physical part, the investigation stalled. In many cases, the insurance company may also need that part to pursue the manufacturer for a defect.
I recommend getting a clean plastic bin or a heavy duty zipper bag. Place the broken parts inside. Label the bag with the date of the failure, the location in the house, and the name of the plumber who removed it. Store this container somewhere safe, like a garage shelf, until the entire review process is completely closed.
Phase 3: Documenting the Fix as It Happens
Once you have captured the pre-repair evidence and secured the broken parts, the actual emergency work begins. You might think your documentation job is done, but the mitigation phase itself requires tracking. This is particularly important because you will likely be submitting the cost of these temporary repairs for reimbursement.
Reviewers need to see that the methods and materials used were strictly for temporary protection, not a full permanent upgrade disguised as an emergency fix. To prevent confusion, capture the process.
Take photos of the materials being used. If the roofer is laying down a massive blue tarp, take a photo of the tarp spread out over the yard before it goes up, and another photo of it secured to the roof line. If a mitigation crew sets up four commercial dehumidifiers and three heavy duty fans, take photos of the equipment sitting in the room. Record the make and model numbers if they are visible.
⚠️ Warning: Do not get in the way of safety professionals or contractors doing dangerous work. You do not need to be on the roof with them. Take photos from a safe vantage point on the ground.
Phase 4: Organizing Receipts and Expense Logs
The final step of managing your temporary repairs documentation for insurance claim files happens at your desk. Temporary fixes cost money. You might have to buy plywood from a hardware store, pay an emergency call out fee to a plumber at 2:00 AM, or rent a wet vacuum.
A common mistake is tossing these crinkled, faded receipts into a shoebox and planning to deal with them later. By the time later arrives, the ink has faded, and you cannot remember if a specific hardware store run was for the claim or for a weekend gardening project.
I advise building a highly structured log immediately. This integrates perfectly into a broader Property Claim Evidence Pack, ensuring all your proof is centralized and easy to navigate.
The Emergency Expense Tracker
Create a simple spreadsheet or a handwritten ledger. Every time you spend money to stabilize the property, record it using these exact fields.
| Date of Expense | Vendor or Store | Items / Service Rendered | Total Cost | Linked Photo Set | Receipt File Name |
|---|---|---|---|---|---|
| Oct 12 | City Hardware | 3 sheets 1/2 inch plywood, screws | $145.20 | Photos_LivingRoom_01 to 05 | Receipt_Oct12_Hardware.pdf |
| Oct 12 | 24/7 Emergency Plumbing | Call out fee, cap leaking line | $350.00 | Video_Sink_Leak.mp4 | Invoice_Oct12_Plumber.pdf |
For the physical receipts, take a clear, well lit photo of the paper receipt immediately. Save it as a PDF if possible, and name the file clearly. If the vendor emails you an invoice, save the PDF directly to your main claim folder. Never rely on the vendor’s portal to store your invoices, as those links often expire.
What Reviewers Actually Look For in Emergency Invoices
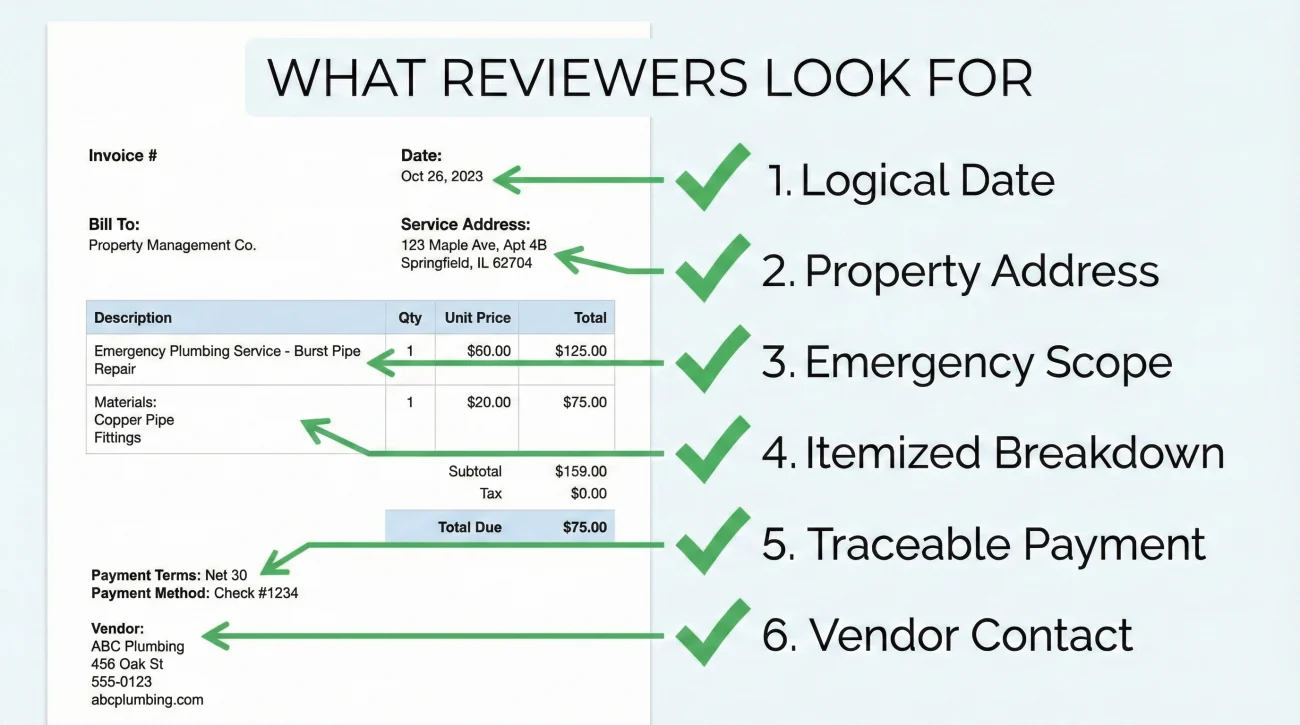
A vague receipt is a magnet for delays. When operations teams review an emergency mitigation invoice, they generally look for six specific criteria:
- ✅ Date: Must logically match the timeline of the damage.
- ✅ Property address: Confirms the work happened at the insured location.
- ✅ Clear scope: Explicitly states it was “emergency mitigation” or “temporary stabilization.”
- ✅ Itemized breakdown: Lists materials and labor separately, not just a vague lump sum.
- ✅ Traceable payment: Shows how it was paid, which is easier to verify than cash.
- ✅ Vendor contact: Legible phone number and address for the contractor.
When You Already Fixed It: The Salvage Plan
If you found this guide after the cleanup is already done and the temporary patch is in place, do not panic. You can still build a viable evidence pack, but you must shift your focus to the aftermath and the paper trail.
First, write a detailed timeline log. Explain exactly what you saw when you discovered the damage, what time it was, and the immediate steps taken. Second, work with your emergency contractor to ensure their invoice is highly detailed and accurately describes the condition they found upon arrival. Finally, take extensive photos of the temporary fix and the removed debris, if it is still on site. When the original scene is gone, contextual notes and detailed logs become your primary evidence.
Common Evidence Traps with Emergency Fixes
In day-to-day claims ops, the fastest wins usually come from avoiding unforced errors. When an owner takes the time to document their temporary work, but does it incorrectly, it can cause just as many delays as not documenting it at all.
Paying a contractor in cash for an emergency roof tarp, accepting a handwritten note that just says “Roof Work”, and taking zero photos of the roof before the tarp was placed.
Taking wide and close photos of the missing shingles. Paying with a traceable method. Requiring an itemized invoice that clearly states “Emergency tarp installation to prevent interior water intrusion”.
Another frequent trap is blurring the line between a temporary patch and a permanent repair. A temporary repair is meant to mitigate further loss. Two clear examples are placing a tarp over a hole in the roof, or having a plumber cap off a broken water line. Permanent repairs, on the other hand, restore the property entirely, such as completing a full roof replacement or rebuilding and painting the water damaged drywall.
While specific policy requirements and approval processes vary across different insurers, the operational principle remains universal: comprehensive photos, clear receipts, and a written timeline are always required. Moving into permanent repair territory before a reviewer has inspected the initial damage tends to create unnecessary friction in your file.
How to Communicate Your Temporary Repairs
Documentation is only useful if it is properly communicated to the people reviewing your file. You need to establish a clear paper trail showing that you acted responsibly to protect the property, and that you have the evidence to prove it.
When you notify the desk reviewer about the mitigation steps you took, keep the message neutral, factual, and strictly focused on the timeline of events. You are simply stating what happened and providing the corresponding proof.
Script 1: Notifying the Reviewer of Emergency Mitigation
When you introduce your temporary repairs documentation to the reviewer, you want to set a professional tone and clearly separate this emergency fix from the final repair. A clean operational habit is to build your message around a logical structure: first state the action, then clarify that it is temporary, attach the proof, and immediately ask for a written confirmation.
Here is what that looks like in practice:
Hello [Reviewer Name],
I am writing to update you on the status of the property. To prevent further damage, I arranged for temporary emergency repairs on [Date].
Specifically, [briefly state the action, e.g., a plumber capped the leaking pipe / a tarp was placed over the damaged roof section]. Please note that these are temporary measures to stabilize the property, not permanent repairs.
I have attached a PDF containing the pre-repair damage photos, as well as a copy of the emergency service invoice.
Could you please reply to confirm that you have received these documents and added them to my file?
Thank you,
[Your Name]
Script 2: Following Up on Unacknowledged Receipts
If you send your emergency invoices and hear nothing back for several days, do not assume they are being processed. Desk reviewers handle hundreds of files, and attachments frequently get missed. A polite follow up is necessary to protect your timeline.
To do this effectively, I recommend using a specific communication formula. This structure removes any emotion and focuses purely on file hygiene. It makes it incredibly easy for the reviewer to just reply “Yes, received,” which gives you the written trail you need. The formula is simple:
[Polite greeting] + [Reference to previous date] + [Specific document name] + [Confirmation request]
Here is how you apply that formula into a quick email:
Hello [Reviewer Name],
I am following up on the temporary repair documentation I sent on [Date].
I want to ensure the emergency invoice from [Vendor Name] for [Amount] has been successfully attached to my file for review.
Please let me know if you need this document sent in a different format, or reply to confirm it is in the system.
Thank you,
[Your Name]
Final Thoughts on Temporary Repair Records
Navigating the chaotic hours after property damage is incredibly stressful. The instinct to fix things immediately is a sign of a responsible property owner. However, balancing that urgency with the discipline of documentation is what separates a smooth process from a stalled one.
By pausing to take wide and close photos, by refusing to throw away broken physical evidence, and by treating every emergency receipt as a critical piece of data, you maintain total clarity over your file. You remove the guesswork for the reviewer, and you build a timeline that is much harder to question. Take a deep breath, pull out your camera, and document the reality of the situation before you allow anyone to change it.
❓ FAQ
⏱️ Do I have to wait for an adjuster to arrive before making a temporary repair?
In most cases, you are expected to take reasonable steps to mitigate further damage immediately. You do not usually need to wait for an inspection to place a tarp, board a window, or shut off water, as long as you take comprehensive photos of the damage before doing so.
💰 Should I keep the receipts for materials I bought myself, like plywood and tape?
Yes. Every expense related to securing the property should be logged and saved. Treat a receipt from a local hardware store for a roll of plastic sheeting with the same care you would treat a major contractor invoice.
🛑 Does making a temporary repair mean the claim is finalized?
No. A temporary repair is simply an emergency measure to stop active damage. It is entirely separate from the process of evaluating and funding the permanent, final repairs to restore the property to its original state.
🌧️ How many photos should I take before placing a roof tarp?
Take as many as safely possible. Capture wide shots of the entire roof slope, medium shots of the damaged section, and close ups of broken or missing shingles, all from a safe vantage point before the tarp obscures the area.
📞 How do I send my emergency repair receipts to the reviewer?
Scan or photograph the receipts clearly, save them as PDF files, and email them to the reviewer. Always request a reply confirming that the documents were received and successfully added to your file.
🔍 What happens if the temporary patch fails and water comes in again?
Document the new damage immediately with new photos and videos. Add an entry to your timeline log noting the date and time the temporary fix failed, and notify your reviewer in writing about the changing situation.
🧾 What if the receipt ink fades?
Thermal paper receipts fade quickly, especially in heat. Take a clear, well lit photo of the receipt the moment you get it, and save it as a PDF file in your digital claim folder.
🧑🔧 What if the contractor won’t itemize the invoice?
Politely explain in writing that your insurance process strictly requires an itemized breakdown of materials and labor for reimbursement. Do not accept a generic slip that just says “Emergency Work.”
📅 What if I don’t know the exact time of loss?
If you were away when the damage happened, provide a realistic discovery window. State clearly in your timeline log exactly when you left the property and the exact time you returned to find the damage.
📂 How do I send batches of documents without confusing the file?
Group your documents logically, combine photos into a single PDF if possible, use very clear email subject lines, and always include a short bulleted list in the email body detailing exactly what you attached.
⚠️ Disclaimer: PropertyClaimChecklist.com provides practical guidance, process checklists, and example follow-ups to help you organize a property claim and move it forward. It is not policy language, claim documentation, legal content, or a substitute for your insurer's instructions. Always rely on your carrier's requirements and your actual policy terms for what must be submitted and how decisions are made.